I just received an email asking the following:

“I’m using Visual Studio 2012 and publishing web projects to the file system. How can I include files to be published which are not a part of my project"?”

I thought that I would answer here so that everyone could see the answer.

In Visual Studio 2012 (and in VS 2010 if you have downloaded the web publish updates via the Azure SDK) when you create a web publish profile we will create a .pubxml file under the Properties\PublishProfiles for C# or My Project\PublishProfiles for VB. If you open that file you will notice that it is actually an MSBuild file. When you publish your web project (either from the VS dialog or from the command prompt) the .pubxml file is combined with your project file to execute the publish. Since this is an MSBuild file you can directly edit the file to customize behavior of the publish process. In this case the question asker, lets call him Chris, has asked how to include some additional files into the publish payload.

This can be accomplished by the following.

  1. Create an MSBuild target which can gather the set of files to be added
  2. Extend the web publish process to include the files

Creating a target is pretty simple, and I’ll cover the contents of the target but first lets look at issue #2.

We need to add an MSBuild target which executes during the period in which files are being collected to be published. We have an MSBuild property which contains the set of targets which make up this phase, PipelineCollectFilesPhaseDependsOn, which is used as a dependency property as you might have guessed. In order to insert a target into that you can use something like the following in your .pubxml file.


    CustomCollectFiles;
    $(PipelineCollectFilesPhaseDependsOn);
  

Here I extend the PipelineCollectFilesPhaseDependsOn by pre-pending CustomCollectFiles, which is a target that I declared directly in the .pubxml file. This will make sure that my target gets executed at the correct time. Now when you publish your web app the CustomCollectFiles will be executed. Now let’s move on to what the contents of the target should contain. One way that you can do this is to add files to the FilesForPackagingFromProject item list. In my case I wanted to publish all the files in a folder named “additional files” which was one folder above the project directory. Take a look at the modifications that I made to my .pubxml file.


    CustomCollectFiles;
    $(PipelineCollectFilesPhaseDependsOn);


    <_CustomFiles Include="$(MSBuildThisFileDirectory)..\..\..\additional files\**\*" />

    
      additional files\%(RecursiveDir)%(Filename)%(Extension)


In this case the CustomCollectFiles target gathers the files into the _CustomFiles item. Notice how I declared the path to the folder. I used the MSBuildThisFileDirectory property. This property was introduced in MSBuild 4.0 and it points to the folder of the MSBuild file which contains it. So it will point to the folder which contains the .pubxml file (either Properties\PublishProfiles or My Project\PublishProfiles). After that, the files are included in the FilesForPackagingFromProject item list. The one special item to take notice of here is the declaration for the DestinationRelativePath metadata value. Since this file is not in the project we have no context on where the files should be placed when published. This is where the DestinationRelativePath metadata comes in. Here you specify the relative location to the publish root of the file. In my case I used additional files\%(RecursiveDir)%(Filename)%(Extension). Which will place all the files in the additional files folder under the same relative path to where they were picked up from.

You can see a sample project at https://github.com/sayedihashimi/publish-samples/tree/master/FileSysIncludeOtherFiles and if you are just looking for the .pubxml file https://github.com/sayedihashimi/publish-samples/blob/master/FileSysIncludeOtherFiles/FileSysIncludeOtherFiles/Properties/PublishProfiles/ToFilesys.pubxml.

Sayed Ibrahim Hashimi | @SayedIHashimi

Comment Section

Comments are closed.


Today I saw the following question on StackOverflow MSDeploy - Deploying Contents of a Folder to a Remote IIS Server and decided to write this post to answer the question.

Web Deploy (aka MSDeploy) uses a provider model and there are a good number of providers available out of the box. To give you an example of some of the providers; when syncing an IIS web application you will use iisApp, for an MSDeploy package you will use package, for a web server webServer, etc. If you want to sync a local folder to a remote IIS path then you can use the contentPath provider. You can also use this provider to sync a folder from one website to another website.

The general idea of what we want to do in this case is to sync a folder from your PC to your IIS website. Calls to msdeploy.exe can be a bit verbose so let’s construct the command one step at at time. We will use the template below.

msdeploy.exe -verb:sync -source:contentPath="" -dest:contentPath=""

We use the sync verb to describe what we are trying to do, and then use the contentPath provider for both the source and the dest. Now let’s fill in what those values should be. For the source value you will need to pass in the full path to the folder that you want to sync. In my case the files are at C:\temp\files-to-pub. For the dest value you will give the path to the folder as an IIS path. In my case the website that I’m syncing to is named sayedupdemo so the IIS path that I want to sync is ‘sayedupdemo/files-to-pub’. Now that give us.

msdeploy.exe –verb:sync -source:contentPath="C:\temp\files-to-pub" -dest:contentPath='sayedupdemo/files-to-pub'

For the dest value we have not given any parameters indicating what server those command are supposed to be sent to. We will need to add those parameters. The parameters which typically need to be passed in are.

  • ComputerName – this is the URL or computer name which will handle the publish operation
  • Username – the username
  • Password – the password
  • AuthType – the authType to be used. Either NTLM or Basic. For WMSvc this is typically Basic, for Remote Agent Service this is NTLM

In my case I’m publishing to a Windows Azure Web Site. So the values that I will use are:

All of these values can be found in the .publishSettings file (can be downloaded from Web Site dashboard from WindowsAzure.com). For the ComputerName value you will need to append the name of your site to get the full URL. In the example above I manually added ?site=sayedupdemo, this is the same name as shown in the Azure portal. So now the command which we have is.

msdeploy.exe 
    –verb:sync 
    -source:contentPath="C:\temp\files-to-pub" 
    -dest:contentPath='sayedupdemo/files-to-pub'
            ,ComputerName="https://waws-prod-blu-001.publish.azurewebsites.windows.net/msdeploy.axd?site=sayedupdemo"
            ,UserName='$sayedupdemo'
            ,Password='thisIsNotMyRealPassword'
            ,AuthType='Basic' 

OK we are almost there! In my case I want to make sure that I do not delete any files from the server during this process. So I will also add –enableRule:DoNotDeleteRule. So our command is now.

msdeploy.exe 
    –verb:sync 
    -source:contentPath="C:\temp\files-to-pub" 
    -dest:contentPath='sayedupdemo/files-to-pub'
            ,ComputerName="https://waws-prod-blu-001.publish.azurewebsites.windows.net/msdeploy.axd?site=sayedupdemo"
            ,UserName='$sayedupdemo'
            ,Password='thisIsNotMyRealPassword'
            ,AuthType='Basic' 
    -enableRule:DoNotDeleteRule 

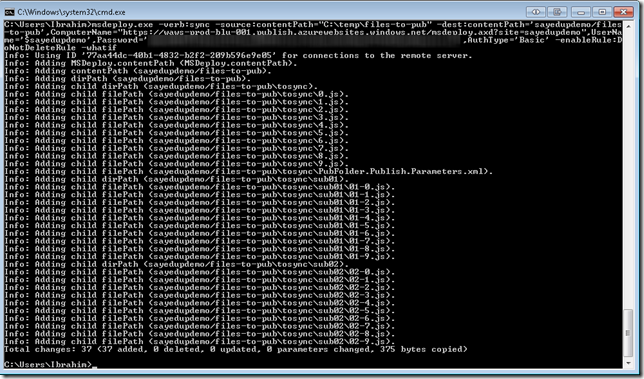
At this point before I execute this command I’ll first execute it passing –whatif. This will give me a summary of what operations will be without actually causing any changes. When I do this the result is shown in the image below.

SNAGHTML204f5cd

After I verified that the changes are all intentional, I removed the –whatif and executed the command. After that the local files were published to the remote server. Now that I have synced the files each publish after this will be result in only changed files being published.

If you want to learn how to snyc an individual file you can see my previous blog post How to take your web app offline during publishing.

dest:auto

In the case of the question it was asked with dest:auto, you can use that but you will have to pass in the IIS app name as a parameter and it will replace the path to the folder. Below is the command.

msdeploy.exe 
    -verb:sync
    -source:contentPath="C:\temp\files-to-pub" 
    -dest:auto
        ,ComputerName="https://waws-prod-blu-001.publish.azurewebsites.windows.net/msdeploy.axd?site=sayedupdemo"
        ,UserName='$sayedupdemo'
        ,Password='thisIsNotMyRealPassword'
        ,AuthType='Basic' 
-enableRule:DoNotDeleteRule 
-setParam:value='sayedupdemo',kind=ProviderPath,scope=contentPath,match='^C:\\temp\\files-to-pub$'

Thanks,
Sayed Ibrahim Hashimi @SayedIHashimi


Comment Section

Comments are closed.


When we released VS2010 we add support for web.config (XDT) transforms during publish/package. Note: From now on I’ll only use the word publish from now on but the full content relates to packaging as well. In the original implementation when you published your web project the web.config file would be transformed by the file web.{Configuration}.config, where {Configuration} is the project build configuration. For example Debug, or Release. If you publish on Release and there exists a web.release.config we will take your web.config and transform it with web.release.config before publishing.

Cascading web.config transformations

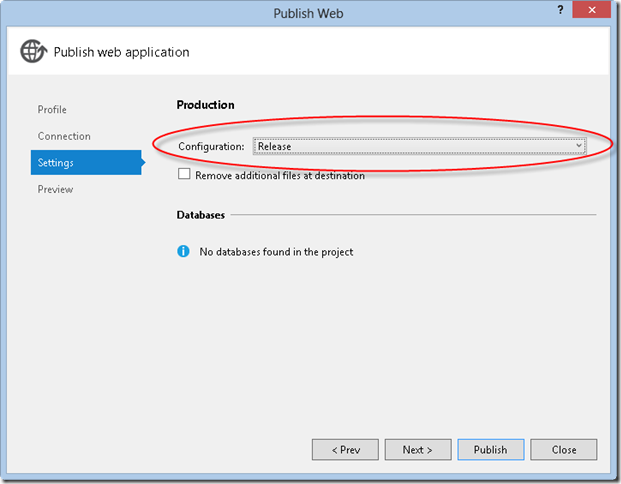
In VS 2012 (as well as the publishing updates for VS2010 through the Azure SDK) now support the concept of publish specific transforms. You can also now specify the project configuration used for a profile when publishing on the publish dialog.

SNAGHTML45b19fc

In this case I have created a profile named Production and set the Configuration to Release. When I publish this project the following transformations will be applied (if the files exist) in this order.

  1. web.release.config
  2. web.production.config

I think that we got this wrong when we initially implemented the support. We should have created profile specific transforms instead of ones based on build config, but having these cascading transforms are still pretty useful. For example I may want to remove the attribute debug=”true” from the compilation element and then inside of the profile specific transform we would override appSettings/WCF endpoints/logging config/etc for that environment.

In VS there is a right-click option on web.config for Add Config Transform, but we were not able to update the functionality of that to automatically create profile specific transforms. Don’t worry it will be released soon with our first set of updates for web tooling. For now you will need to create a new file with the correct name and add it to your project. Note: if you want it to show up nested under web.config you’ll need to add the metadata Web.config to the item in the .csproj/.vbproj file.

web.config transform preview

Previously the only way to test the functionality for these transformation was to actually publish or package the web project. This gets old pretty quick. In order to simplify creating these transforms we have introduced the Preview Transform menu option. This is the coolest feature in VS 2012 (OK I’m a bit biased, but still its the coolest).

image

In my web.release.config I have left the default contents, which just removes the debug attribute. Here is what I see when I select this on web.release.config for my project.

image

You can see that in the image above we can see that the debug flag was indeed removed as expected.

In my web.production.config I have a transform which simply updates the email app setting value. Here is the really cool part when I preview the transform for web.production.config the previewer will look into the profile and determine the build configuration which has been configured, and it will ensure that transform is applied before the profile specific one. For example take a look at the result for web.production.config.

image

In the image above you can see the note that web.release.config was applied first followed by web.production.config. In the result we can see that web.release.config removed the debug flag and that web.production.config updated the email address value.

We also do a little bit to help out in case there are errors in either the web.config or a transform. You can see errors in the Output Window and double click it to go directly to where the error exists.

Note: Scott Hanselman has a 5 minute video showing this and other updates.

Another note: If you need to transform any file besides web.config during publish then install my extension SlowCheetah.

Sayed Ibrahim Hashimi | @SayedIHashimi

Comment Section

Comments are closed.


One of the most requested features of Visual Studio 2012 was the ability to open projects in both VS 2012 as well as VS 2010 (requires VS 2010 SP1). In case you haven’t heard we did implement that feature. You may be wondering how we were able to do this and how this may impact you.

If you open the .csproj/.vbproj for a Web Project created in VS2010 you will see the following import statement.

When you open this project in VS 2012 there are a few changes made to your project file to ensure that it can be opened in both VS 2010 SP1 and VS 2012. One of the changes made to the project when it is first loaded in VS 2012 is to add the following to replace that import statement.


  10.0
  
    $(MSBuildExtensionsPath32)\Microsoft\VisualStudio\v$(VisualStudioVersion)

We removed the hard-coded 10.0 and instead used the property VisualStudioVersion. When building in Visual Studio 2012 this value will always be 11.0, but for VS 2010 it doesn’t exist. That is why we defaulted it to 10.0 above.

There are some scenarios where building from the command line will require to set this property explicitly. Before we get there let me explain how this property gets set (in this order)

  1. If VisualStudioVersion is defined as an environment variable/global MSBuild property, that is used.
    • This is how VS and the VS developer command prompt set this value
  2. Based on the file format version of the .sln file (toolset used is sln file format –1)
    • To simplify this statement, the .sln file will build with specifying VisualStudioVersion to the value of the version of VS which created the .sln file.
  3. Choose default
    • 10.0 if VS 2010 is installed
    • Highest-versioned sub-toolset version installed

For #2 when you are building a .sln file the value of VisulStudioVersion will be –1 of the Format Version found in the .sln file. The important thing to note here is that if you build a .sln file it will build with the value of VisulStudioVersion corresponding to the version of VS which created the .sln file. So if you create a .sln file in VS2012 and you always build that .sln file the value for VisualStudioVersion will be 11.0. In many cases if you build the .sln file you are good.

If you are building .csproj/.vbproj files w/o going through a .sln file? If you build a web project from the command line (not the developer prompt) then the value for VisualStudioVersion used will be 10.0. That is an artifact of the properties which I showed above. In this case you should pass this in as an MSBuild property. For example

msbuild.exe MyAwesomeWeb.csproj /p:VisualStudioVersion=11.0

In this case I’m passing in the property explicitly. This will always override any other mechanism to determine the value for VisualStudioVersion. If you are using the MSBuild task in a build script, then you can specify the property either in the Properties attribute or the AdditionalProperties attribute. See my previous blog post on the difference between Properties and AdditionalProperties.

If you encounter any funny behavior when building/publishing and you notice that the wrong .targets files are being imported then you may need to specify this property.

Sayed Ibrahim Hashimi | @SayedIHashimi


Comment Section

Comments are closed.


SlowCheetah v2.4 Released

Comments [0]
I jus released a new version of SlowCheetah, my Visual Studio extension which enables you to transform app.config, and other XML files, during F5 for non-web projects. In this update I added support for Visual Studio 2012 as well as the bug fixes below.
  1. Fix for Preview command doesn't show up for all web.config transforms
  2. Fix for XML transforms not working with Azure SDK
  3. Fix for XML transforms not working with Azure SDK
  4. Fix for .config files do no transform in VS 2012 RC
  5. Fix for In web project, project File gets modified while adding transformation
  6. Fix for Add Transform should not show up for .settings files
  7. Fix for Transforms should be added as None

If you are interested in the project you can take a look at the code at https://github.com/sayedihashimi/slow-cheetah and if you have any issues please file a bug at https://github.com/sayedihashimi/slow-cheetah/issues.


Thanks,
Sayed Ibrahim Hashimi | @SayedIHashimi


    Comment Section

    Comments are closed.


    << Older Posts | Newer Posts >>