Please read my updated post, the info below is no longer required for some scenarios SlowCheetah build server support updated

A few months ago I published a Visual Studio add-in, SlowCheetah – XML Transforms, which enables you to transform any XML file during a build in the same way that you can transform the web.config during publish/package for web projects. Since then I’ve received numerous requests to demonstrate how the transforms can be kicked in from a CI server. It’s actually pretty easy because all the logic from a transform perspective is contained inside of MSBuild tasks/targets. The Visual Studio add-in itself is only delivering the support for gestures/preview.

Before I dive into how to enable this for a CI server let me explain how the plugin works and then the CI integration will be come much clearer. When you load a project/solution in Visual Studio for the first time after you installed SlowCheetah a set of files will be written to %localappdata%\Microsoft\MSBuild\SlowCheetah\v1. Those file are:


Name

Description

Install-Manifest.xml An XML file which describes the files that are installed. This is used by the plugin itself, you should never have to do anything with this file.
SlowCheetah.Tasks.dll The assembly which contains the MSBuild task which transforms XML files.
SlowCheetah.Transforms.targets The MSBuild file which enables XML file transformation


The add-in adds the following menu command to any XML file for supported project types.

image

When you click on this for the first time the add-in needs to make some changes to your project file so you are prompted to accept that. After you do the following changes are applied to your project file.

  1. A new MSBuild property SlowCheetahTargets is added to the project and it points to the SlowCheetah.transforms.targets file in %localappdata%
  2. An import for that file is added

More specifically the elements added to your project file are.


  $(LOCALAPPDATA)\Microsoft\MSBuild\SlowCheetah\v1\SlowCheetah.Transforms.targets


Note: If you look at your project file they will not be next to each other. The property will be towards the top of the project file and the import towards the bottom.

So now you might have an idea of why this won’t work on your CI server, the file SlowCheetah.Transforms.targets will not exist in the %localappdata% folder. There is an easy to way to fix this which doesn’t require any changes to your CI server. Check in the files and update your import. Here is what I did:

  1. Create a folder named SlowCheetah in the same folder as my solution
  2. Added SlowCheetah.Tasks.dll and SlowCheetah.Transforms.targets to that folder
  3. Create a solution folder named SlowCheetah in the solution
  4. Drag and drop the files from your SlowCheetah folder into the SolutionFolder
  5. Updated my project file to point to these files

Now your solution should look roughly like the following image.

image

Note: Steps #3/#4 are not strictly required

For #5 you’ll have to edit your project file, don’t worry its an easy modification. Just follow these steps:

  1. Right click on the project and select unload
  2. Right click on the unloaded project and select Edit
  3. Update the value for the SlowCheetahTargets import

In my case the folder that I placed the files into is 1 directory above the project itself. So the new value for the property is as follows.

$(MSBuildProjectDirectory)\..\SlowCheetah\SlowCheetah.Transforms.targets

After that I checked in all the files, kicked off a build and viola the files are transformed. Let me know if you need any more info.

Sayed Ibrahim Hashimi – @SayedIHashimi

Note: I work for Microsoft, but these are my own opinions


Comment Section

Comments are closed.


I get a lot of questions regarding how to publish your web plus your database incrementally. The users of Database projects in Visual Studio 2010 are especially curious about this and how we can integrate Web Deploy with VSDDcmd.exe. I’ve put together a sample which shows how you can use Web Deploy to deploy your web content and VSDBcmd.exe to incrementally publish your database, and the sample also shows how to do this from Team Build.

I am working on creating some more formal documentation for this, but I thought you guys might find this useful before we are able to formalize it. At the end of the post you will the link to download the sample. What you are going to find below is an email which I sent to a tech writer who will be creating the formalized documentation.


What you are going to find here is a bit different from other references which you may have seen but I think that this solution is going to work nicely for enterprise customers.

Here were my guiding principles when creating this:

  • · You should be able to easily publish from the dev machine in a similar way that Team Build will
    • Publish process should not be drastically different when publishing locally versus Team Build, if it is then it makes it easier for devs to make things work locally but not in the team env.
  • · Typical Team Build customers like to build the .sln file (instead of hand crafting .proj files which are responsible for building the individual projects)
  • · We should be able to publish both Web + Web Service + DB in a single shot
  • · We should make it easy to define new environments
  • · You should be able to use the same outputs to publish to multiple environments if you want to
  • · Admins should not have to give developers settings to target environments
    • i.e. connection strings for prod cannot be checked in via the developer. This rules out using web.config transforms

Let me break down the assets quickly:

Asset name

Description

ContactManager-WCF.sln

The solution file which will be built both locally and from Team Build

Publish\Publish.proj

The MSBuild project file which contains the logic to publish

Publish\EnvConfig\Env-Dev.proj

The MSBuild project file which contains the properties for the Dev environment.

Publish\Publish-Dev.cmd

A script file which developers can double click to invoke a deploy. It just calls out to MSBuild with the correct properties set.

Publish\Reset-Local.cmd

You can ignore this, it’s just a script I was using to reset my target env so that I could test publishing.

Publish\Reset-Database.sql

Same as previous, you can ignore it just used for my own testing.

Pubish\Out

The folder where the build output will be placed when building locally.

Here is what happens:

Publish.proj has a set of targets which perform the deployment. If you want to publish locally you will not use Visual Studio (because if you did you wouldn’t be able to publish all projects at the same time), instead the developer will simply double click the Publish\Publish-Dev.cmd file. When it is executed locally the Publish.proj file will build the solution and then publish all the projects.

At the very top of that file you will find the following Import statement

This import will use the property TargetEnvPropsFile to import the environment specific properties. This gives the hook to easily define environment specific properties. In my example case I have placed those properties in the file Publish\EnvConfig\Env-Dev.proj. When publishing when I call msbuild.exe I specify the property /p:TargetEnvPropsFile=EnvConfig\Env-Dev.proj which will import all the properties from that file. You can imagine that we can create different files for different environments and we just specify a different property value and the rest of the process stays the same.

For environments which devs don’t have access to admins can create these property files and just pass a different value for TargetEnvPropsFile.

After the solution is built the Publish.proj file will perform the following:

  1. Publish the database using vsdbcmd.exe and pass in the .deploymanifest file which was generated from the database project
  2. Update the SetParameters.xml file to contain the env specific values for both web projects
  3. Execute the deploy.cmd file for both web projects to perform the publish

Note: I had to create a parameters.xml file for the ContactManager.Mvc project in order to enable me to easily update the WCF endpoint value for the service.

Team Build

In Team Build here is what we are going to do:

  • Create a Team Build definition which will first build the .sln file and then the Publish.proj file
  • Specify the properties which will cause the web packages to be created and also specify the property for the target environment
    • See the image below for the Team Build setup

In the Team Build situation there are these customizations that need to be made to the Publish.proj file:

  • Pick up the output location from what Team Build specifies
  • Ensure that Clean in not executed (taken care of by Team Build)
  • Ensure that the .sln is not built (taken care of by Team Build)


01

Note: You can also specify the property /p:Whatif=true if you want to simulate a publish (MSDeploy updates are spewed to the command line, and DB operations written to a .sql file).

You can download the samples below, please send me any questions/concerns with this approach.

https://github.com/sayedihashimi/sayed-samples/raw/master/ContactManager-publish-example/ContactManager-publish-example-v01.zip

You can find the latest sources for this at my github repository: https://github.com/sayedihashimi/sayed-samples/tree/master/ContactManager-publish-example

Sayed Ibrahim Hashimi – @SayedIHashimi


Comment Section

Comments are closed.


Note: I’d like to thank Tom Dykstra for helping me put this together

Overview

In this tutorial you'll see how to use a web deployment package package to deploy an application. A deployment package is a .zip file that includes all of the content and metadata that's required to deploy an application.

Deployment packages are often used in enterprise environments. This is because a developer or a continuous integration server can create the package without needing to know things like passwords that are stored in Web.config files. Only the server administrator who actually installs the package needs to know those passwords, and that person can enter the details at installation time.

In a smaller organization that doesn't have separate people for these roles, there's less need for deployment packages. But you can also use deployment packages as a way to back up and restore the state of an application. After you use a deployment package to deploy, you can save the package,. Then if a subsequent deployment has a problem, you can quickly and easily restore the application state to the earlier state by reinstalling the earlier package. (This scenario is more complicated if database changes are involved, however.)

This tutorial shows how to use Visual Studio to create a package and IIS Manager to install it. For information about how to create and install packages using the command line, see ASP.NET Deployment Content Map on the MSDN web site.

To keep things relatively simple, this example assumes you have already deployed the application and its databases, and you only need to deploy a code update. You have made the code update, and you are ready to deploy it first to your test environment (IIS on your local computer) and then to your hosting provider. You have a Test build configuration that you use for the test environment and you use the Release build configuration for the production environment. In the example, the name of the Visual Studio project is ContosoUniversity, and instructions for its initial deployment can be found in a series of tutorials that will be published in December on the ASP.NET web site.

The hosting provider shown, Cytanium.com, is one of many that are available, and its use here does not constitute an endorsement or recommendation.

Note The following example uses separate packages for the test and production environments, but you can also create a single deployment package that can be used for both environments. This would require that you use Web Deploy parameters instead of Web.config transformations for Web.config file changes that depend on deployment destination. For information about how to use Web Deploy parameters, see How to: Use Parameters to Configure Deployment Settings When a Package is Installed.

Configuring the Deployment Package

In this section, you'll configure settings for the deployment package. Some of these settings are the same ones that you set also for one-click publish, others are only for deployment packages.

Open the Package/Publish Web tab of the Project Properties window and select the Test build configuration.

For this deployment you aren't making any database changes, so clear Include all databases configured in Package/Publish SQL tab. Make sure Exclude files from the App_Data folder is selected.

Review the settings in the section labeled Web Deployment Package Settings:

  • By default, deployment packages are created as .zip files. You don't need to change this setting.
  • By default, deployment packages are created in the project's obj\Test\Package folder. You don't need to change this setting.
  • The default IIS web application name is the name of the project with "_deploy" appended to it. Remove that suffix. You want the application to be named just ContosoUniversity in IIS on your computer.
  • For this tutorial you're not deploying IIS settings, so you don't need to enter a password for that.

The Package/Publish Web tab now looks like this:
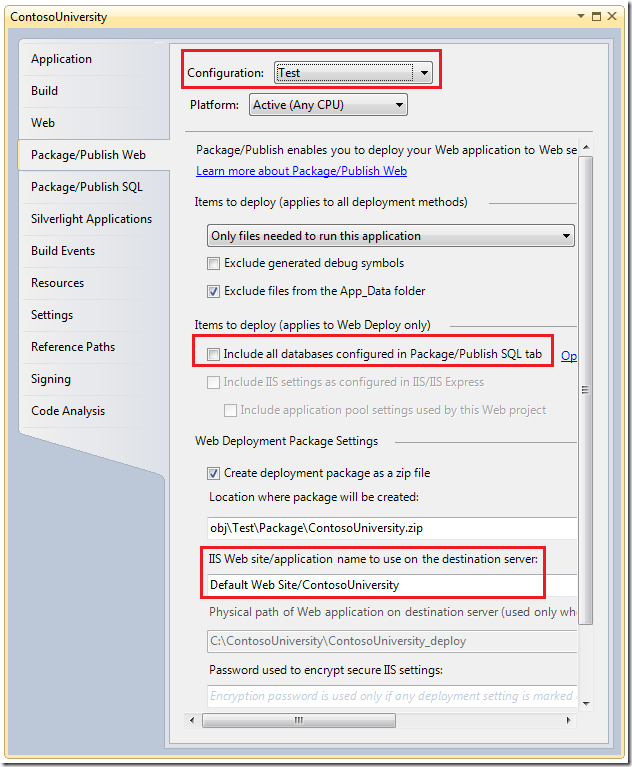
Package_Publish_Web_tab_Test

You also need to configure settings for deploying to the production environment. Select the Release build configuration to do that.

Change IIS Web site/application name to use on the destination server to a string that will serve as a reminder of what you need to do later when this value is displayed in the IIS Manager UI: "[clear this field]". The text box on this page won't stay cleared even if you clear it, so entering this note to yourself will remind you to clear this value later when you deploy. When you deploy to your hosting provider, you will connect to a site, not to a server, and in this case you want to deploy to the root of the site.
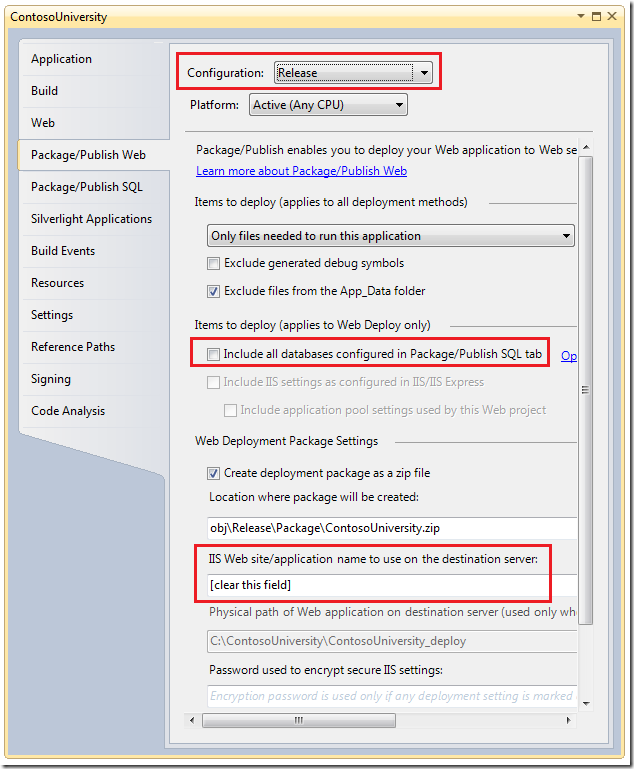
Package_Publish_Web_tab_Release

Creating a Deployment Package for the Test Environment

To create a deployment package, first make sure you've selected the right build configuration. In the Solution Configurations drop-down box, select Test.

Solution_Configurations_dropdown

In Solution Explorer, right-click the project that you want to build the package for and then select Build Deployment Package.

The Output window reports successful a build and publish (package creation) and tells you where the package was created.
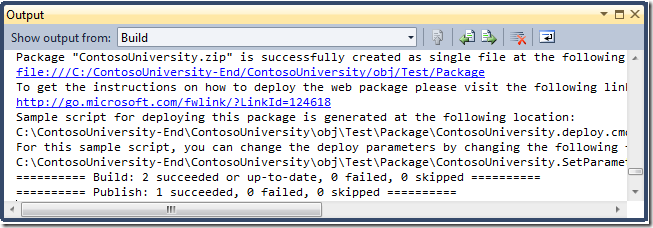
Output_Window_package_creation

Installing the Deployment Package in the Test Environment

The next step is to install the deployment package in IIS on your development computer.

Run IIS Manager. In the Connections pane of the IIS Manager window, expand the local server node, expand the Sites node, and select Default Web Site. Then in the Actions pane, click Import Application. (If you don't see an Import Application link, the most likely reason is that you have not installed Web Deploy. You can use the Web Platform Installer to install both IIS and Web Deploy.)
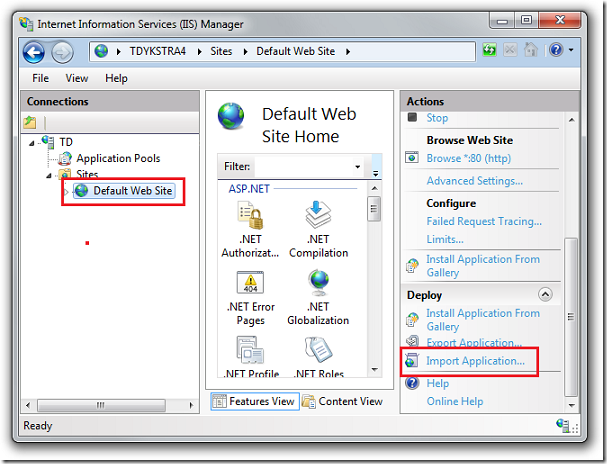
Default_Web_Site_in_inetmgr

In the Select the Package wizard step, navigate to the location of the package you just created. By default, that's the obj\Test\Package folder in your ContosoUniversity project folder. (A package created with the Release build configuration would be in obj\Release\Package.)
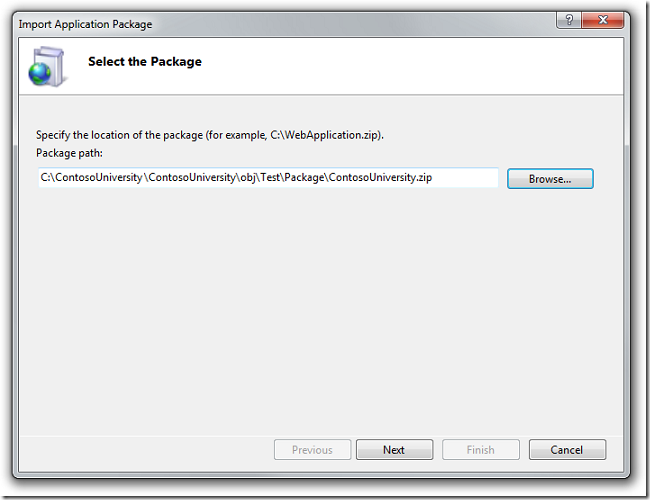
Select_the_Package_dialog_box

Click Next. The Select the Contents of the Package step is displayed.
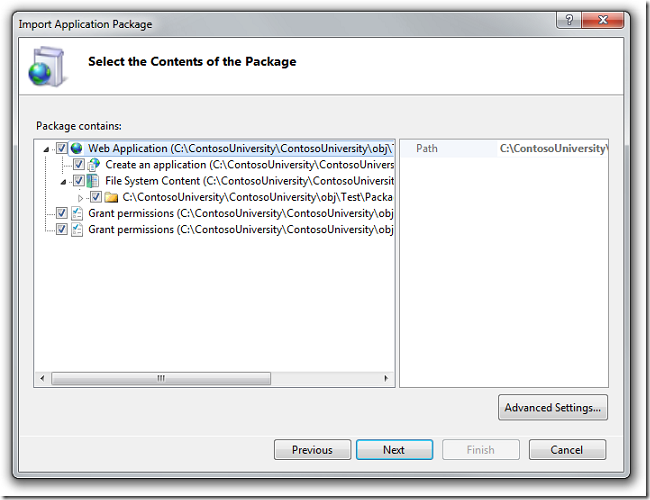
Select_the_Contents_of_the_Package_dialog_box

Click Next.

The step that allows you to enter parameter values is displayed. The Application Path value defaults to "ContosoUniversity", because that's what you entered on the Package/Publish Web tab of the Project Properties window.
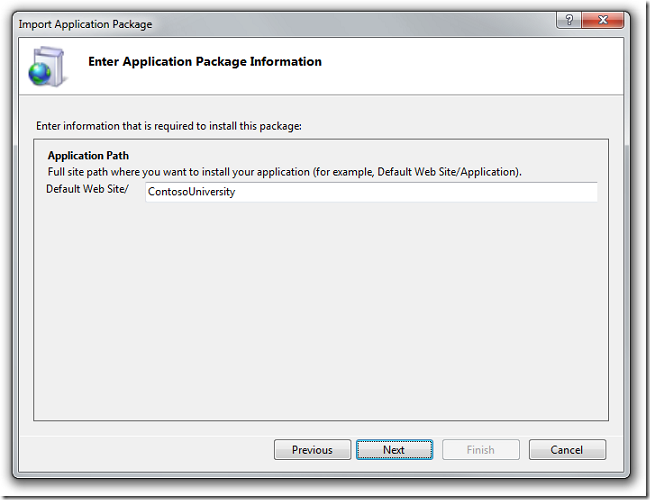
Enter_Application_Package_Information_dialog_box

Click Next.

The wizard asks if you want to delete files at the destination that aren't in the source.
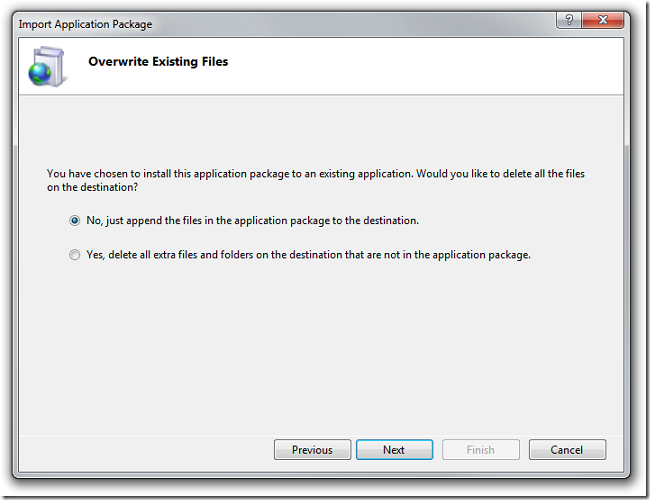
Overwrite_Existing_Files_dialog_box

In this case you haven't deleted any files that you want to delete at the destination, so the default (no deletions) is okay. Click Next.

IIS Manager installs the package and reports its status.
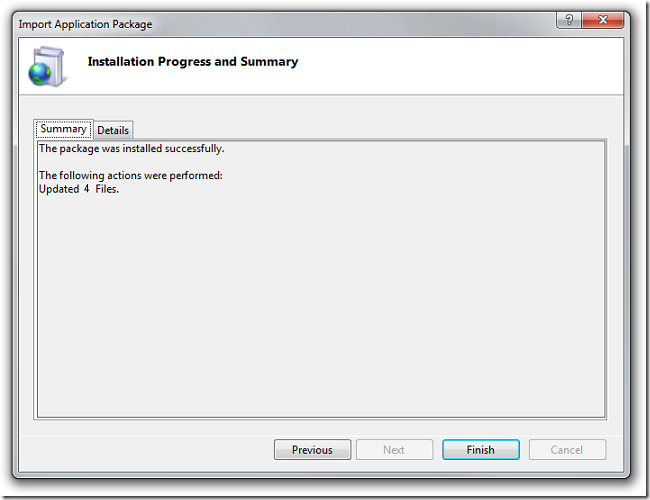
Installation_Progress_and_Summary_dialog_box

Click Finish.

Open a browser and run the application in test by going to the URL http://localhost/ContosoUniversity.
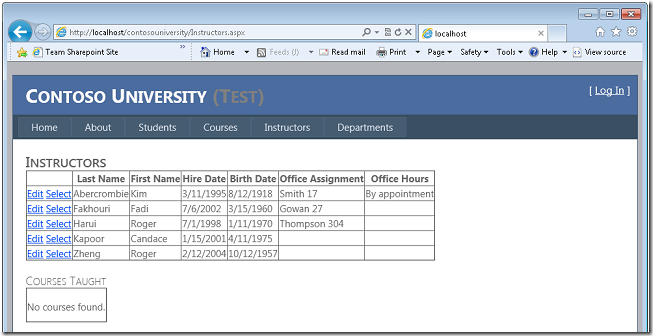
Instructors_page_with_separate_name_fields_Test

Installing IIS Manager for Remote Administration

The process for deploying to production is similar except that you create the package using the Release build configuration, and you install it in IIS Manager using a remote connection to the hosting provider. But first you have to install the IIS Manager feature that facilitates remote connections.

Click the following link to use the Web Platform Installer for this task:

Connecting to Your Site at the Hosting Provider

After you install the IIS Manager for Remote Administration, run IIS Manager. You see a new Start Page in IIS Manager that has several Connect to ... links in a Connection tasks box. (These options are also available from the File menu.)
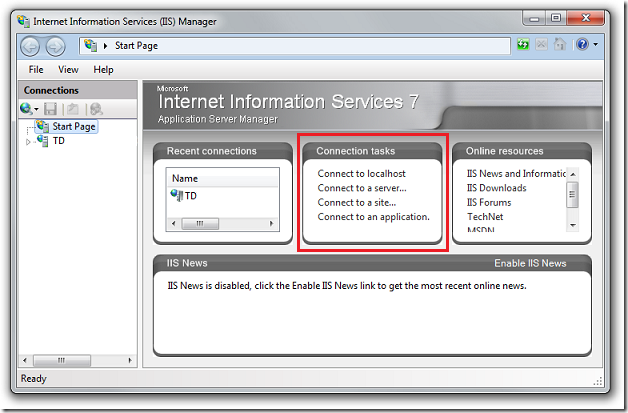
IIS_Manager_Remote_Admin_Start_Page

In IIS Manager, click Connect to a site. In the Specify Site Connection Details step, enter the Server name and Site name values that are assigned to you by your provider, and then click Next. For a hosting account at Cytanium.com, you get the server name from Service URL in the Visual Studio 2010 section of the welcome email. The site name is indicated by "Site/application" in the same section of the email.
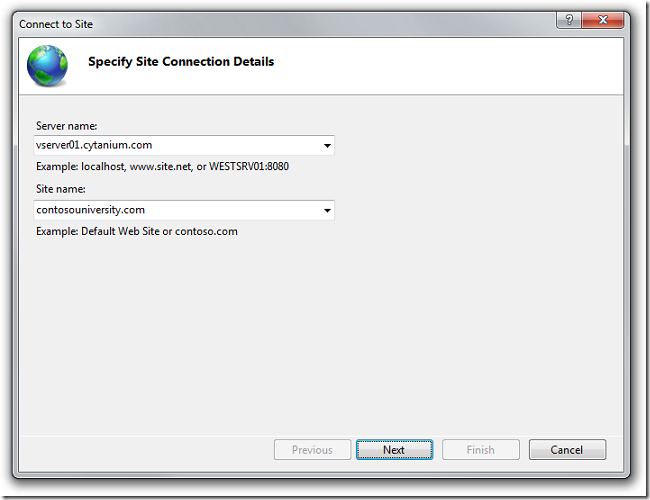
Specify_Site_Connection_Details_dialog_box

In the Provide Credentials step, enter the user name and password assigned by the provider, and then click Next:
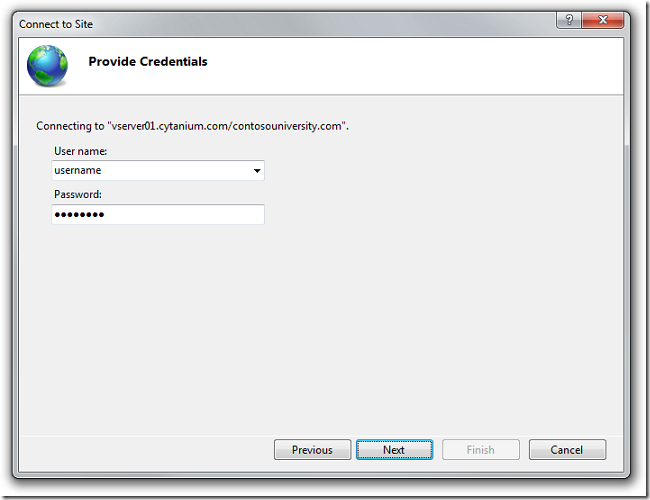
Provide_Credentials_dialog_box

You might see a Server Certificate Alert dialog box. If you're sure that you've entered the correct server and site name, click Connect.

Server_Certificate_Alert_dialog_box

In the Specify a Connection Name step, click Finish.
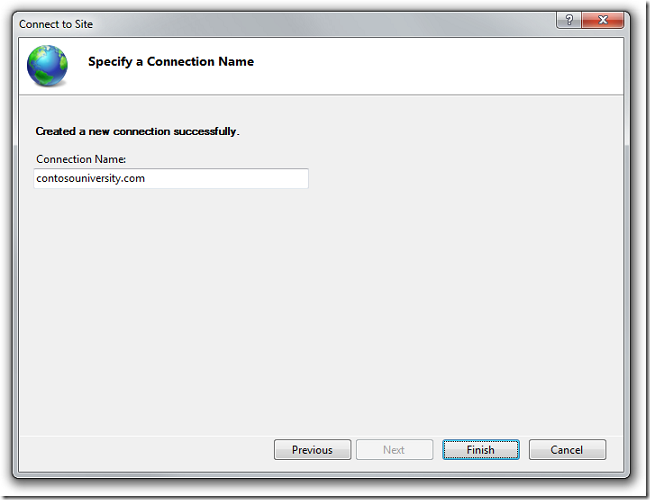
Specify_a_Connection_Name_dialog_box

After IIS Manager connects to the provider's server, a New Feature Available dialog box might appear that lists administration features available for download. Click Cancel — you've already installed everything you need for this deployment.
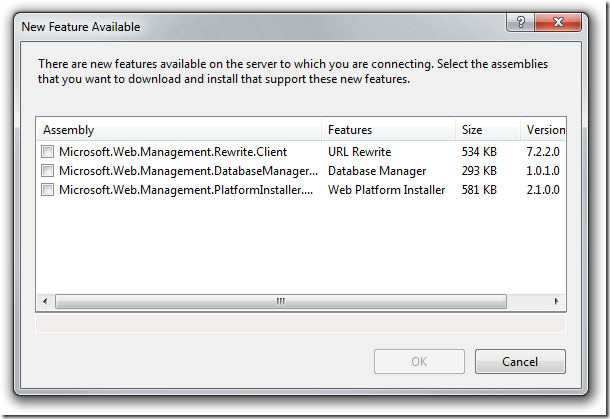
New_Feature_Available_dialog_box_Cytanium

After the New Feature Available box closes, the IIS Manager window appears. There's now a node in the Connections pane for the site at the hosting provider.

Creating a Package for the Production Site

The next step is to create a deployment package for the production environment. In the Visual Studio Solution Configurations drop-down box, select the Release build configuration.

Solution_Configurations_dropdown_Release

In Solution Explorer, right-click the ContosoUniversity project and then select Build Deployment Package.

The Output window reports a successful build and publish (package creation), and it tells you that the package is created in the obj\Release\Package folder in your project folder.

Installing the Package in the Production Environment

Now you can install the package in the production environment. In the IIS Manager Connections pane, select the new connection you added earlier. Then click Import Application, which will walk you through the same process you followed earlier when you deployed to the test environment.
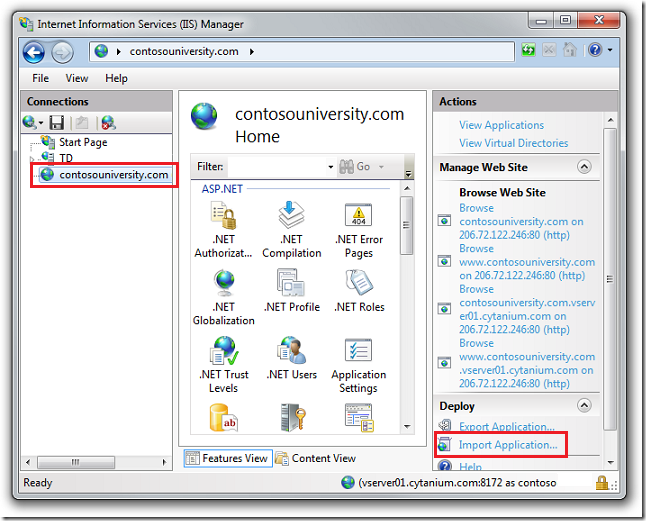
IIS_Manager_with_provider_site_selected

In the Select the Package step, select the package that you just created:
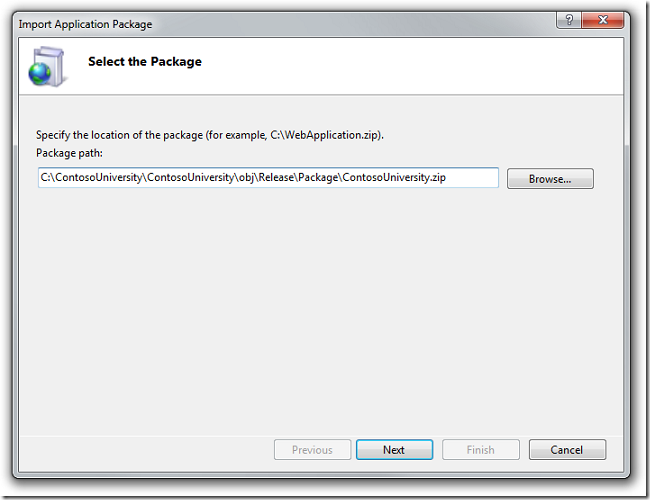
Select_the_Package_dialog_box_Prod

In the Select the Contents of the Package step, leave all the check boxes selected and click Next:
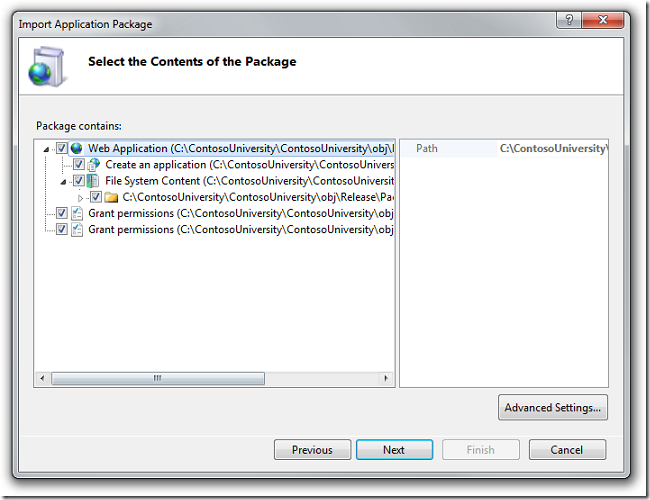
Select_the_Contents_of_the_Package_dialog_box_Prod

In the Enter Application Package Information step, clear the Application Path and click Next:
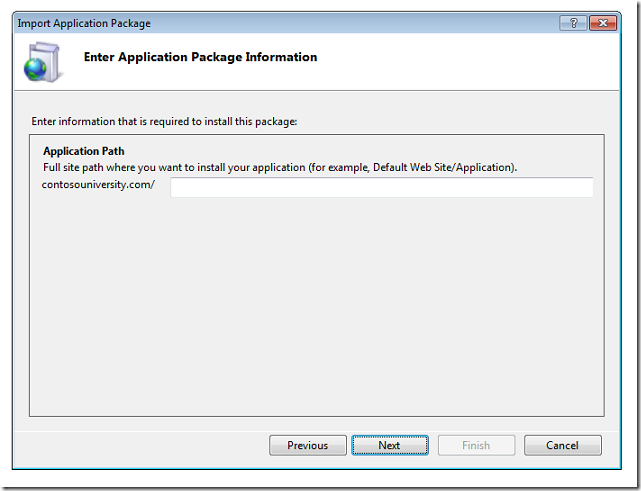
Enter_Application_Package_Information_dialog_box_Prod

The wizard asks if you want to delete files at the destination that aren't in the source.
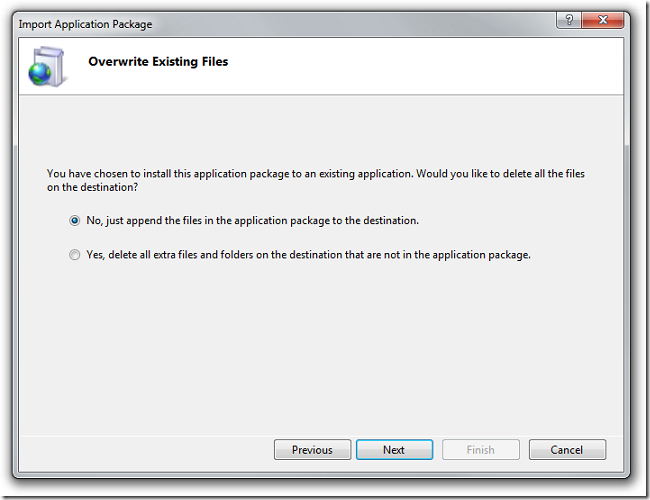
Overwrite_Existing_Files_dialog_box

You don't need to have anything deleted, so just click Next.

When you get the warning about installing to the root folder, click OK:
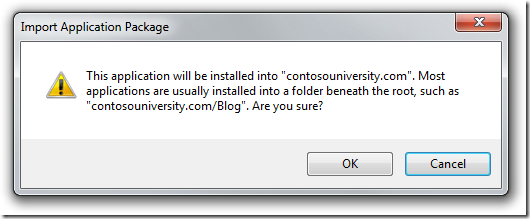
Installation_in_root_folder_warning

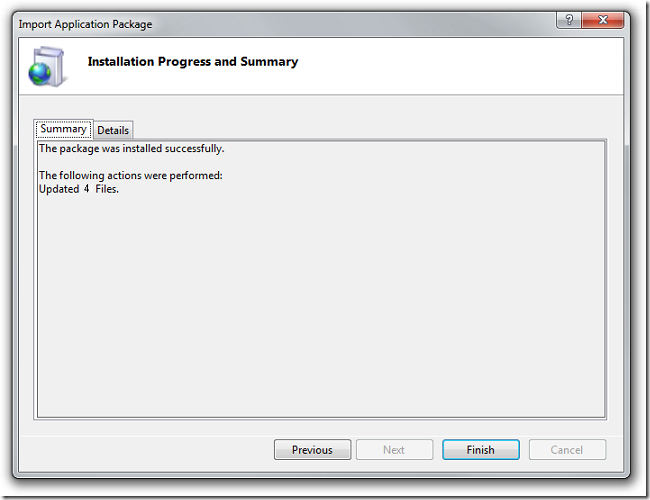
Package installation begins. When it's done, the Installation Progress and Summary dialog box is shown:
Installation_Progress_and_Summary_dialog_box

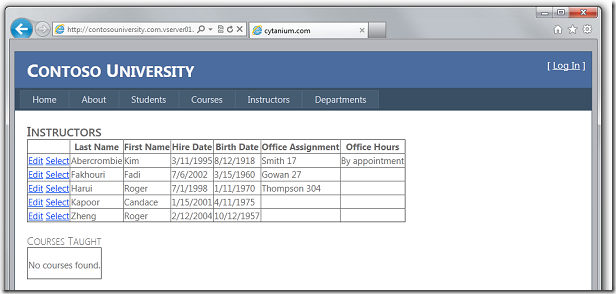
Click Finish. Your application has been deployed to the hosting provider's server, and you can test by browsing to your public site's URL.
Instructors_page_with_separate_name_fields_Prod

You've now seen how to deploy an application update by manually creating and installing a deployment package. For information about how to create and install packages from the command line in order to be able to integrate them into a continuous integration process, see the ASP.NET Deployment Content Map on the MSDN web site.

Sayed Ibrahim Hashimi – @SayedIHashimi

ddd


Comment Section

Comments are closed.


Note: I’d like to thank Tom Dykstra for helping me put this together

As part of the deployment process you might need to set permissions on one or more folders in the destination web application. For example, if your application allows users to upload files, it needs write access to a folder in order to store the uploaded files. By default, theweb publishing pipeline (the automated deployment process) automatically sets write permission on the App_Data folder in order to enable database updates in case you store databases in that folder, and you can use the same method to make the deployment process automatically set permissions on any folder you choose.

The .wpp.targets File

The web publishing pipeline is controlled by MSBuild .targets files that are installed with Visual Studio. Rather than editing the Visual Studio .targets files, you can create a project-specific .targets file that Visual Studio will use to modify the deployment process for a specific project. To do that, you create an XML file in the project folder and name it < projectname>.wpp.targets. The following example shows XML markup that causes the web publishing pipeline to set write permissions for a folder named Elmah located in the root folder of the application. The sample is designed to work for both deployment methods: publish or web deployment package.


        $(_MSDeployDirPath_FullPath)\Elmah
        Read,Write
        Directory
        setAclResourceType;setAclAccess


        ProviderPath
        setAcl
        ^$(_EscapeRegEx_MSDeployDirPath)\\Elmah$
        Add write permission to the Elmah folder.
        {$(_MsDeployParameterNameForContentPath)}/Elmah
        $(_DestinationContentPath)/Elmah
        Hidden
        $(VsSetAclPriority)
        True


The first Target element ("SetupCustomAcls") causes a setAcl action to be added to the deployment package's source manifest when the package is created. The source manifest is a file that specifies what to include in the deployment package. The path to the folder is specified using an MSBuild variable (_MSDeployDirPath_FullPath) that specifies the path to the project root folder:


This isn't all you need to do, however, because the permissions actually need to be set on the folder in the destination application, not the folder in the deployment package. That's why the second Target element is needed. The second Target element ("DeclareCustomParameters") creates a user-defined Web Deploy parameter named ElmahSetAclParam. The value of this parameter will change the value of the setAcl path at deploy time. TheDefaultValue element of the ElmahSetAclParam parameter sets the value that will be used when you are deploying by creating and installing a deployment package; the Value element sets the value that will be used when you are publishing without using a deployment package.

If you are using a deployment package, the actual path to the destination folder isn't known until the package is installed. Therefore the default value of this parameter is set using an MSDeploy parameter that resolves to the name of a system-defined Web Deploy parameter:

{$(_MsDeployParameterNameForContentPath)}/Elmah

When the package is created, _MsDeployParameterNameForContentPath is translated into "{IIS Web Application Name}", so the actual default value becomes "{IIS Web Application Name}/Elmah". When the package is installed, the value of that Web Deploy parameter is the path of the destination root folder, and so as a result the ElmahSetAclParam parameter resolves to the physical path of the destination Elmah folder (for example: C:\inetpub\wwwroot\ContosoUniversity\Elmah). That path then replaces the package's physical path for the Elmah setAcl element in the source manifest.

When you publish the project rather than using a deployment package, the Value element instead of the DefaultValue element provides the value for the ElmahSetAclParam parameter. In that case, you are deploying from Visual Studio, and Visual Studio has the actual destination path value in an MSBuild property, so the Value element can specify that MSBuild property directly and does not need to use a Web Deploy variable:

$(_DestinationContentPath)/Elmah

The "Hidden" value in the Tags element prevents the ElmahSetAclParam parameter from being displayed in the IIS Manager UI if you use IIS Manager to install the package. The UI doesn't have to show the value, because a user never needs to change it manually.

Hidden

Adding More Folders

You can add more folders by adding ItemGroup elements. The following example builds on the earlier one by also granting Read permission for the bin folder to the NETWORK SERVICE account. (This is required in some cases for SQL Server Compact.) Notice that in order to specify the account to which access is granted, "setAclUser" was added to the < AdditionalProviderSettings> element, and a element specifying NETWORK SERVICE was added.


                $(_MSDeployDirPath_FullPath)\Elmah
                Read,Write
                Directory
                setAclResourceType;setAclAccess
            
            
                $(_MSDeployDirPath_FullPath)\bin
                NETWORK SERVICE
                Read
                Directory
                setAclUser;setAclResourceType;setAclAccess


                ProviderPath
                setAcl
                ^$(_EscapeRegEx_MSDeployDirPath)\\Elmah$
                Add write permission to the Elmah folder.
                {$(_MsDeployParameterNameForContentPath)}/Elmah
                $(_DestinationContentPath)/Elmah
                Hidden
                $(VsSetAclPriority)
                True
            
            
                ProviderPath
                setAcl
                ^$(_EscapeRegEx_MSDeployDirPath)\\Bin$
                Add read permission to the bin folder.
                {$(_MsDeployParameterNameForContentPath)}/bin
                $(_DestinationContentPath)/bin
                Hidden
                $(VsSetAclPriority)
                True


.targets File Caching in Visual Studio

Setting up .targets files is like writing code -- rarely do you get everything right the first time. If you do make a mistake that you have to fix, you should be aware that Visual Studio caches target files. This means that every time you change a .targets file, you must exit Visual Studio and restart it before you rebuild the package in order to see the effect of your change. This is not an issue if you create packages using the command line.

Making Changes that Affect Parameters in Packages

Visual Studio will not rebuild a package if it cannot determine that a change has been made, and changes that affect Web Deploy parameters are sometimes not recognized as changes. Therefore, if you make any changes that affect parameters in the source manifest, it's best to select Clean Solution from the Build menu in order to delete the contents of the Package folder before you rebuild the package.

Sayed Ibrahim Hashimi – @SayedIHashimi


Comment Section

Comments are closed.


When I talk to people about the XDT (web.config) transforms that web projects support for package/publish one of the most common questions is “Does this work for non-web projects?” Unfortunately the answer is No, but myself and a friend of mine (Chuck England) have created a Visual Studio add in which enables just this. You can find it in the Visual Studio gallery under the name SlowCheetah – XML Transforms. Here is an overview of the features of the add in.

  1. Add tooling to desktop project to create XDT transforms
  2. Transform app.config for desktop projects based on build configuration
  3. Transform any XML file to the output folder base on build configuration
  4. Add tooling to enable previewing XDT transforms
  5. For web projects easily transform other XML files during package/publish

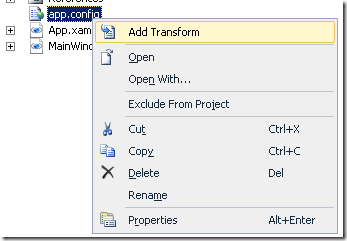
After you install the add in you will get the following menu item when you right click any XML file.

Add-Transform01

For each build configuration defined you will get a transform created as a child item.

App-Config

These files are stub XDT transforms. You can place your transform content in those files and they will be executed when you debug/run your application. For example if your app.config contained the following.


And your app.debug.config contained


When you run your application the config file created will contain the following.


Transforming other files

You are not limited to transforming app.config, you can transform any XML file. When you create a transform for an arbitrary XML file when you run your application the transformed XML file will be dropped into the output (bin) folder of your application.

Previewing Transforms

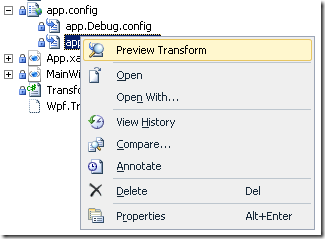
You can easily preview transform results as well. After you have created the transform file you can right click on it and select Preview Transform.

Preview-Transform-Command

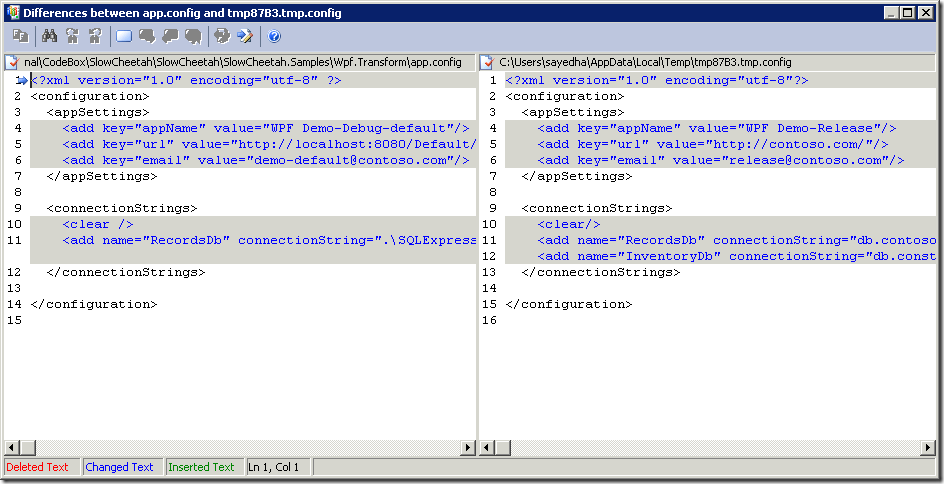
After you click it you should see the following.

Preview-Transform-Diff


I hope you guys find this useful. Let me know if you have any feedback on this!

Note: This add in was created by me and a friend of mine, these are not created nor supported by Microsoft.

Sayed Ibrahim Hashimi – @sayedihashimi


Comment Section

Comments are closed.


<< Older Posts | Newer Posts >>