Today someone sent me an email asking how to call the System.Environment.GetFolderPath method passing in the value of MyDocuments for the value of the folder parameter. I was expecting the below to do the trick.


    $([System.Environment]::GetFolderPath(System.Environment.SpecialFolder.MyDocuments))


To my surprise I was faced with the following error.

Build started 3/20/2011 6:20:36 PM.

Project "C:\temp\_NET\msbuild\PropFunction01.proj" on node 1 (default targets).

C:\temp\_NET\msbuild\PropFunction01.proj(20,5): error MSB4186: Invalid static method invocation syntax: "[System.Environment]::GetFolderPath(System.Environment.Spec ialFolder.MyDocuments)". Requested value 'System.Environment.MyDocuments' was not found. Static method invocation should be of the form: $([FullTypeName]::Method()), e.g. $([System.IO.Path]::Combine(`a`, `b`)).

Done Building Project "C:\temp\_NET\msbuild\PropFunction01.proj" (default targets) -- FAILED.

Build FAILED.

So I sent an email to the MSBuild team asking “WTF why doesn’t this work?!”, and Dan Moseley (a lead dev there) sent me a snippet that worked, its below.


    $([System.Environment]::GetFolderPath(SpecialFolder.MyDocuments))


In that snippet instead of using the fully qualified class name of System.Environment.SpecialFolder.MyDocuments, for some reason you have to use the shortened name of just SpecialFolder.MyDocuments. It seems like a bug to me, but at least there is a work around!

Resources

Sayed Ibrahim Hashimi – @sayedihashimi


Comment Section

Comments are closed.


Today I saw a post on stackoverflow.com asking Using Microsoft AJAX Minifier with Visual Studio 2010 1-click publish. This is a response to that question. The Web Publishing Pipeline is pretty extensive so it is easy for us to hook in to it in order to perform operation such as these. One of those extension points, as we’ve blogged about before, is creating a .wpp.targets file. If you create a file in the same directory of your project with the name {ProjectName}.wpp.targets then that file will automatically be imported and included in the build/publish process. This makes it easy to edit your build/publish process without always having to edit the project file itself. I will use this technique to demonstrate how to compress the CSS & JavaScript files a project contains before it is published/packaged.

Eventhough the question specifically states Microsoft AJAX Minifier I decided to use the compressor contained in Packer.NET (link in resources section). I did this because when I looked at the MSBuild task for the AJAX Minifier it didn’t look like I could control the output location of the compressed files. Instead it would simply write to the same folder with an extension like .min.cs or .min.js. In any case, when you publish/package your Web Application Project (WAP) the files are copied to a temporary location before the publish/package occurs. The default value for this location is obj\{Configuration}\Package\PackageTmp\ where {Configuration} is the build configuration that you are currently using for your WAP. So what we need to do is to allow the WPP to copy all the files to that location and then after that we can compress the CSS and JavaScript that goes in that folder. The target which copies the files to that location is CopyAllFilesToSingleFolderForPackage. (To learn more about these targets take a look at the file %Program Files (x86)%\MSBuild\Microsoft\VisualStudio\v10.0\Web\Microsoft.Web.Publishing.targets.) To make our target run after this target we can use the MSBuild AfterTargets attribute. The project that I created to demonstrate this is called CompressBeforePublish, because of that I create a new file named CompressBeforePublish.wpp.targets to contain my changes.


      <_JavaScriptFiles Include="$(_PackageTempDir)\Scripts\**\*.js" />
      <_CssFiles Include="$(_PackageTempDir)\Content\**\*.css" />


Here I’ve created one target, CompressJsAndCss, and I have included AfterTargets=”CopyAllFilesToSingleFolderForPackage” which causes it to be executed after CopyAllFilesToSingleFolderForPackage. Inside this target I do two things, gather the files which need to be compressed and then I compress them.

1. Gather files to be compressed

  <_JavaScriptFiles Include="$(_PackageTempDir)\Scripts\**\*.js" />
  <_CssFiles Include="$(_PackageTempDir)\Content\**\*.css" />

Here I use an item list for both JavaScript files as well as CSS files. Notice that I am using the _PackageTempDir property to pickup .js & .css files inside the temporary folder where the files are written to be packaged. The reason that I’m doing that instead of picking up source files is because my build may be outputting other .js & .css files and which are going to be published. Note: since the property _PackageTempDir starts with an underscore it is not guaranteed to behave (or even exist) in future versions.

2. Compress files

I use the Packer task to compress the .js and .css files. For both sets of files the usage is pretty similar so I will only look at the first usage.

Here the task is fed all the .js files for compression. Take a note how I passed the files into the task using, %(_JavaScriptFiles.Identity), in this case what that does is to cause this task to be executed once per .js file. The %(abc.def) syntax invokes batching, if you are not familiar with batching please see below. For the value of the output file I  use the _PackageTempDir property again. In this case since the item already resides there I could have simplified that to be @(_JavaScriptFiles->’%(FullPath)’) but I thought you might find that expression helpful in the case that you are compressing files which do not already exist in the _PackageTempDir folder.

Now that we have added this target to the .wpp.targets file we can publish/package our web project and it the contained .js & .css files will be compressed. Note: Whenever you modify the .wpp.targets file you will have to unload/reload the web project so that the changes are picked up, Visual Studio caches your projects.

In the image below you can see the difference that compressing these files made.

image

You can download the entire project below, as well as take a look at some other resources that I have that you might be interested in.

Sayed Ibrahim Hashimi

Resources

Comment Section

Comments are closed.


Back in November I participated in Virtual Tech Days which is an online conference presented by Microsoft. In the session I discussed the enhancements to web deployment using Visual Studio 2010 and MSDeploy. Some of the topics which I covered includ:

  • web.conig (XDT) transforms
  • How to publish to local file system using Visual Studio
  • How to publish to a 3rd party host using Visual Studio via MSDeploy
  • How to publish to local IIS server using the .cmd file generated by Visual Studio
  • How to use msdeploy.exe to delete IIS applications
  • How to use the IIS Manager to import web packages
  • How to use msdeploy.exe to deploy a web package to the local IIS server
  • How to use msdeploy.exe to deploy a web package to a remove IIS server
  • How to use msdeploy.exe to deploy a web package & set parameters using SetParameters.xml to a remote IIS server

You can download the video & all of my sample files at http://virtualtechdays.com/pastevents_2010november.aspx. In the samples you will find all of the scripts that I used and a bunch of others which I didn’t have time to cover. Enjoy!

Sayed Ibrahim Hashimi @sayedihashimi


Comment Section

Comments are closed.


A few days ago Jason Zander blogged about the availability of Visual Studio SP1 Beta (all links below in resources section). I am happy to let you guys know that with SP1 Beta we have enabled integration of IIS Express into Visual Studio. After you have installed SP1 Beta you have to download IIS Express separately for the option to “light up”. After you’ve downloaded and installed IIS Express you can now create Web projects and Websites which use IIS Express instead of Cassini (the default web server used in Visual Studio). For more information regarding the difference between IIS Express and IIS/Cassini please see Scott’s blog linked below. Visual Studio 2010 has two types of web projects; Web Application Project (WAP) and Website projects. You can use either project type with IIS Express.

Enabling IIS Express for web projects

For both WAP and Website projects which were using Cassini we have a very simply method for you to use IIS Express. You can just right click then select the context menu option “Use IIS Express”. Take a look at the screen shot that follows for that command.

image

After you do this your project will use IIS Express instead of Cassini going forward. If you wish to revert back to using Cassini you can just right click on the project and select “Use Visual Studio Development Server…” You can also make IIS Express your default web server for new projects as well.

For Web site projects when you create a new site you can create it such that IIS Express hosts it instead of Cassini. From Visual Studio when you select File->New-> Web Site you will see the New Web Site dialog. On that dialog you can click on the Browse button (see image below).
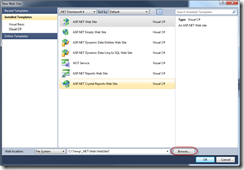
SNAGHTML108dba11

After you click that you will be prompted to enter the location where the site will be located. From there you can select “Local IIS” and the create a new IIS Express site for it.
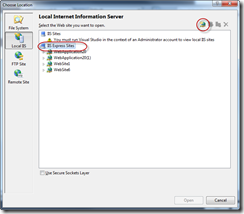
SNAGHTML108f284e

In this dialog you need to select IIS Express Sites then click on the Create New Site button located towards the upper right hand corner. Once you do this it will create a new IIS Express site for your Web site.

Making IIS Express your default web server

In order to make IIS Express for new file based web projects you can go to the menu option Tools->Options->Projects and Solutions->Web Projects and check the “Use IIS Express for new file-based web sites and projects” check box. You can see this option in the next image.
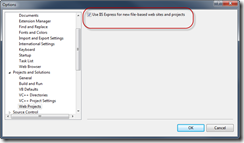
SNAGHTML10527286

After you have done this  new projects/sites will use IIS Express by default. Note: if you have any existing projects/sites you will still have to “opt-in” to using IIS Express for each project.

Using IIS Express

After you have enabled IIS Express to be your projects web server, when you start debugging, or just start running your app, from Visual Studio you will see a new system tray icon appear (image). You can right click on this icon to to quickly see what applications it is hosting. Each hosted application will have its own context menu. From this menu you can browse out to the application as well as stop it quickly.

image

You can also click on “Show All Applications” to open a dialog which give you more information about the sites that IIS Express is hosting. For example I opened this dialog and selected a running application and the result is shown in the image below.
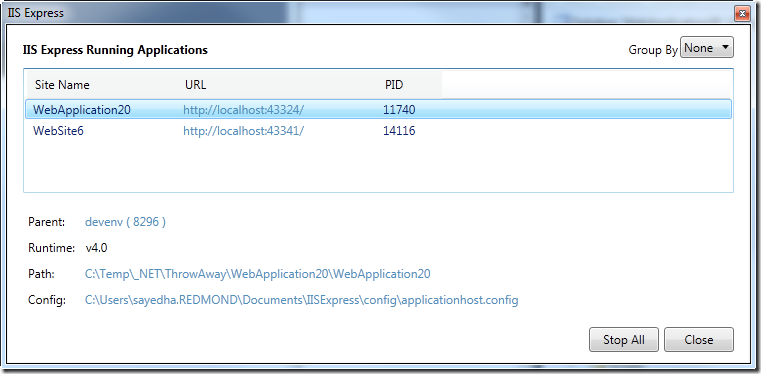
SNAGHTML105b4a00

There are a few notable values here

  • The URL for each hosted application
  • The Runtime version for the application
  • The path to the application
  • The path to the applicationHost.config file

The default location for the applicationHost.config file is your users’ directory. This enables IIS Express to run without requiring admin privileges. As you may know IIS (i.e. the full IIS) uses the applicationHost.config file to store its configuration. IIS Express is similar to IIS in that it uses a file also named applicationHost.config (not the same file as IIS though). The file that IIS uses is stored under the System32 directory and is shared across all users. The IIS Express config is specific to the current user. Regarding the runtime version, this is the version of the CLR which your application pool will use. For IIS Express application pools will, by default, use CLR 4.0. You can change this default in the applicationHost.config file for IIS Express. Visual Studio will assign the correct CLR version to your app pool based on the target framework version.

You can customize a few options for your site directly from Visual Studio. If you select your web project/site in the Solution Explorer and then open the Properties pane (you can right-click and select Properties on the project/site if it is not visible) you should see something similar to the following.

image

These settings will change how IIS Express hosts your site. One of the missing features of Cassini was the ability to host SSL sites. In IIS Express you can enable this. For example for this site I changed the value for SSL Enabled to be True, then a new URL was assigned so that I can use SSL to browse to the site. Please note that IIS Express will install a self-signed cert and you will see the following security warning from Internet Explorer when you browse to an https URL hosted by IIS Express.

image

One thing to make a note of is that when you change the settings for IIS Express here these settings are stored in the applicationHost.config file for IIS Express and not with the project/site itself. So if you are working in a team then your other team members will have to make the same changes. If you want to edit a setting which is not shown on the properties grid then you can edit the applicationHost.config file directly. You can easily open this file by clicking on the applicationHost.config link in the IIS Express dialog shown previously. For WAP projects you can change the port that is used from the Web tab in the project properties page.

Known issues

There are currently some known issues with IIS Express which are listed below. If you run into any more please let us know.

  • Profiling is not supported
  • If you add a Web Deployment Project (WDP) to an IIS Express web site you will have to remove the ‘:’ from the name of the WDP
  • Some issues using WDP for IIS Express sites with sub-webs


Resources

Sayed Ibrahim Hashimi @sayedihashimi


Comment Section

Comments are closed.


A few days ago Jason Zander blogged about the availability of Visual Studio SP1 Beta (all links below in resources section). I am happy to let you guys know that with SP1 Beta we have enabled integration of IIS Express into Visual Studio. After you have installed SP1 Beta you have to download IIS Express separately for the option to “light up”. After you’ve downloaded and installed IIS Express you can now create Web projects and Websites which use IIS Express instead of Cassini (the default web server used in Visual Studio). For more information regarding the difference between IIS Express and IIS/Cassini please see Scott’s blog linked below. Visual Studio 2010 has two types of web projects; Web Application Project (WAP) and Website projects. You can use either project type with IIS Express.

Enabling IIS Express for web projects

For both WAP and Website projects which were using Cassini we have a very simply method for you to use IIS Express. You can just right click then select the context menu option “Use IIS Express”. Take a look at the screen shot that follows for that command.

image

After you do this your project will use IIS Express instead of Cassini going forward. If you wish to revert back to using Cassini you can just right click on the project and select “Use Visual Studio Development Server…” You can also make IIS Express your default web server for new projects as well.

For Web site projects when you create a new site you can create it such that IIS Express hosts it instead of Cassini. From Visual Studio when you select File->New-> Web Site you will see the New Web Site dialog. On that dialog you can click on the Browse button (see image below).

SNAGHTML108dba11

After you click that you will be prompted to enter the location where the site will be located. From there you can select “Local IIS” and the create a new IIS Express site for it.

SNAGHTML108f284e

In this dialog you need to select IIS Express Sites then click on the Create New Site button located towards the upper right hand corner. Once you do this it will create a new IIS Express site for your Web site.

Making IIS Express you default web server

In order to make IIS Express for new file based web projects you can go to the menu option Tools->Options->Projects and Solutions->Web Projects and check the “Use IIS Express for new file-based web sites and projects” check box. You can see this option in the next image.

SNAGHTML10527286

After you have done this  new projects/sites will use IIS Express by default. Note: if you have any existing projects/sites you will still have to “opt-in” to using IIS Express for each project.

Using IIS Express

After you have enabled IIS Express to be your projects web server, when you start debugging, or just start running your app, from Visual Studio you will see a new system tray icon appear (image). You can right click on this icon to to quickly see what applications it is hosting. Each hosted application will have its own context menu. From this menu you can browse out to the application as well as stop it quickly.

image

You can also click on “Show All Applications” to open a dialog which give you more information about the sites that IIS Express is hosting. For example I opened this dialog and selected a running application and the result is shown in the image below.

SNAGHTML105b4a00

There are a few notable values here

  • The URL for each hosted application
  • The Runtime version for the application
  • The path to the application
  • The path to the applicationHost.config file

The default location for the applicationHost.config file is your users’ directory. This enables IIS Express to run without requiring admin privileges. As you may know IIS (i.e. the full IIS) uses the applicationHost.config file to store its configuration. IIS Express is similar to IIS in that it uses a file also named applicationHost.config (not the same file as IIS though). The file that IIS uses is stored under the System32 directory and is shared across all users. The IIS Express config is specific to the current user. Regarding the runtime version, this is the version of the CLR which your application pool will use. For IIS Express application pools will, by default, use CLR 4.0. You can change this default in the applicationHost.config file for IIS Express. Visual Studio will assign the correct CLR version to your app pool based on the target framework version.

You can customize a few options for your site directly from Visual Studio. If you select your web project/site in the Solution Explorer and then open the Properties pane (you can right-click and select Properties on the project/site if it is not visible) you should see something similar to the following.

image

These settings will change how IIS Express hosts your site. One of the missing features of Cassini was the ability to host SSL sites. In IIS Express you can enable this. For example for this site I changed the value for SSL Enabled to be True, then a new URL was assigned so that I can use SSL to browse to the site. Please note that IIS Express will install a self-signed cert and you will see the following security warning from Internet Explorer when you browse to an https URL hosted by IIS Express.

image

One thing to make a note of is that when you change the settings for IIS Express here these settings are stored in the applicationHost.config file for IIS Express and not with the project/site itself. So if you are working in a team then your other team members will have to make the same changes. If you want to edit a setting which is not shown on the properties grid then you can edit the applicationHost.config file directly. You can easily open this file by clicking on the applicationHost.config link in the IIS Express dialog shown previously. For WAP projects you can change the port that is used from the Web tab in the project properties page.

Known issues

There are currently some known issues with IIS Express which are listed below. If you run into any more please let us know.

  • Edit and continue is not supported
  • Profiling is not supported
  • If you add a Web Deployment Project (WDP) to an IIS Express web site you will have to remove the ‘:’ from the name of the WDP
  • Some issues using WDP for IIS Express sites with sub-webs


Resources


Sayed Ibrahim Hashimi @sayedihashimi


Comment Section

Comments are closed.


<< Older Posts | Newer Posts >>