One of the really cool features that we shipped for Visual Studio 2010 was web.config (XDT) transformations. Because the transformations are so simple and straightforward one of the first questions that someone asks after using it is “how can I use this in my other projects?” Unfortunately this feature is only built into the Web Application Projects (WAP). But it is very easy to reuse this because we just rely on an MSBuild task to do the heavy lifting for us. I received an email from that basically went like this

“Hi, I would like to use XDT transformations on my WPF project for both the app.config file as well as my unity.xml file. How can I do this?”

So one answer is to modify your project file to use the TransformXml task as I have blogged previously about (link below). But I thought that since this was such a common problem that I should go ahead and create a .targets file which would solve the above problem and could be re-used by anyone.

Let me clarify the scenario a bit before we dive into the details of the solution. I have create a sample Wpf project, named Wpf01. Inside of that project I have created these files:

  • app.confog
    • app.debug.config
    • app.release.config
  • Sample01.xml
    • Sample01.debug.xml
    • Sample01.release.xml
  • Sub\Sub\Sub01.xml
    • Sub\Sub\Sub01.debug.xml
    • Sub\Sub\Sub01.release.xml

Take a look at the image below (note: I manually edited the project file to make the file nest under each other, I will explain that shortly)

image

The files with .debug/.release are transform files. When I build I expect the following to happen:

  1. Transform app.config with app.{Configuration}.config and write file to output folder with the correct name i.e. Wpf01.exe.config instead of just app.config
  2. Transform Sample01.xml with Sample01.{Configuration}.config and write it to output folder with the name Sample01.config
  3. Transform Sub\Sub\Sub01.xml with Sub\Sub\Sub01.{Configuration}.config and write it to the output folder with the name Sub\Sub\Sub01.xml
  4. None of my source files should change

Usage

Before I get into the solution let me explain how to use the solution first because if you are not interested in the MSBuild details you can skip over that Smile

  1. You must have installed Web projects with Visual Studio on the machine (it contains the TransformXmll task).
  2. Create the folder %ProgramFiles (x86)%\MSBuild\Custom. If you want to share this across team members then see my note at the end of this blog.
  3. Download TransformFiles.targets (link below) and place the file into the folder %ProgramFiles (x86)%\MSBuild\Custom.
  4. Edit your project file (right click on the project Unload Project, right click again and pick edit)
  5. At the end of the project file place the element immediately above the closing tag
  6. For files that you want transformed a metadata value of TransformOnBuild to true. See below on what this means.
  7. Build and take a look at files in your output directory

For #5 lets examine the sample that I created. In this sample I had an app.config file. When I first created the project the entry in the project file for app.config looked like the following.

So what you need to do is to add a new metadata value as described above for that. So it will turn into the following.


  true

The transform targets will look for items that have this value declared on them and then during build it will transform them, if the transform file exists in the same folder as the file itself. You will need to add TransfromOnBuild to all the files that you want to transform. So in my case I added it to app.config, Sample01.xml and Sub01.xml. Note you should not add this to the transform files themselves because you will just waste your own time. After you do this you should perform a build then take a look at the output directory for your transformed files. The app.config should write out the the correct file and the others as expected.

Nest transforms under the source file

You might have noticed that in the image above that the transform files are nested under the files themselves. To do this you need to add the DependentUpon metadata value to the child items. For instance for app.config the child items look like the following.


  app.config


  app.config

Implementation

If you are wondering how this works then this is the section for you. TransformFile.targets has 2 targets; DiscoverFilesToTransform and TransformAllFiles. DiscoverFilesToTransform looks through a set of items (None, Content, and Resource). Inside of DiscoverFilesToTransform I look for values with the %(TransformOnBuild)==true. After all of those are collected I identify if there is an app.config file being transformed and if so it is placed into a specific item list and all others go into another item list.

Inside of TransformAllFiles the TransformXml task is used to transform all of the files. This target injects itself into the build process by having the attribute AfterTargets="Build;_CopyAppConfigFile". So whenever the Build or _CopyAppConfigFile targets are called the TransformAllFiles target will execute.

Here if the full code for this file.


      false
        
    
      false
        
    
      false
    
    
      false
    
    
    <_FilesToTransform>
      false


      DiscoverFilesToTransform;


      <_AppConfigTarget Include="@(AppConfigWithTargetPath->'$(OutDir)%(TargetPath)')" />


      <_AppConfigDest>@(_AppConfigTarget->'%(FullPath)')


      <_FilesToTransform Include="@(None);@(Content);@(Resource);@(EmbeddedResource)"
                         Condition=" '%(TransformOnBuild)' == 'true' "/>


      <_AppConfigFullPath>@(AppConfigWithTargetPath->'%(RootDir)%(Directory)%(Filename)%(Extension)')


      <_FilesToTransform Condition=" '%(FullPath)'=='$(_AppConfigFullPath)' ">
        true


      <_FilesToTransformNotAppConfig Include="@(_FilesToTransform)"
                                     Condition=" '%(IsAppConfig)'!='true'"/>
      
      <_AppConfigToTransform  Include="@(_FilesToTransform)"
                              Condition=" '%(IsAppConfig)'=='true'"/>


Gaps

With most things found on blogs there are some gaps Those are described here.

Clean build => It’s a best practice to delete files upon clean, but in this case I am not. This would be pretty easy to add, if you are interested let us know and I will update the sample.

Incremental build => The transforms will run every time you build even if the outputs are up to date, if this is an issue for you let us know and I will update the sample.

Sharing with team members

If you want to share with team members instead of placing this into %ProgramFiles (x86)% just place it into a folder in version control then change the statement to point to that file instead of using MSBuildExtensionPath.


If you end up using this please let us know what is your experience with it.

Resources

Sayed Ibrahim Hashimi @sayedihashimi


Comment Section

Comments are closed.


Today I just saw a question posted on stackoverflow.com asking Why are some Web.config transforms tokenised into SetParameters.xml and others are not? Let me give some background on this topic for those who are not aware of what the question is.

With Visual Studio 2010 when you package your application using the Build Deployment Package context menu option, see image below.

image

When build the package by default the package will be created in obj\{Configuration}\Package\{ProjectName}.zip where {Configuration} is the current build configuration, and {ProjectName} is the name of the project. So in this case I since I’m building with Debug and the project name is MvcApplication1 the package will be placed at obj\Debug\Package\MvcApplication1.zip. If you take this package and then import into IIS 7 with the “Import Application” option shown below. Note: The machine must have the Web Deployment Tool (aka MSDeploy) installed.

image

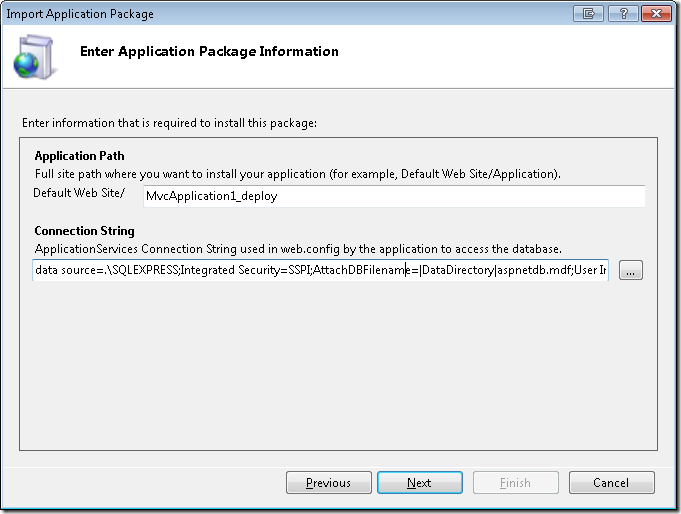
Once you click on Import Application then browse out to the package you will be shown a screen which prompts your for parameters. Its shown below.

SNAGHTML2d2664

On this screen you can see that we are prompting for a couple parameter values here. One is an IIS setting, Application Path, and the other is a connection string which will be placed inside the web.config file. If your Web Application Project (WAP)  had 5 different connection strings then they would automatically show up here on this page. Since connection strings are replaced so often we create parameters for all connection strings by default. You can define new parameters on your own, quite easily actually, but that is the topic for another blog post.

Now back to the question. He is asking why do we “tokenize” the connection strings in web.config. To clarify take a look at my web.config file below.


After I perform a package this will get changed. Take a look @ the web.config file which resides in the package (you can get to the file at obj\{CofigurationName}\Package\PackageTmp\web.config). You will see what is shown below.


So his question is why is the connection string replaced with $(ReplacableToken_ApplicationServices-Web.config Connection String_0) and nothing else is? We do this because we do not want you to accidently copy your web to a location and have it executing SQL statements against a SQL server which you did not intend. The idea is that you will create a package that you can deploy to many different environments. So the value that was in your web.config (or web.debug.config/web.release.config if you are using a web.config transformation) will not be placed inside the web.config in the package. Instead those values will be used as defaults in the package itself. We also create a SetParameters.xml file for you so that you can tweak the values. For my app see the MvcApplication1.SetParameters.xml file below.


The idea is that you can deploy your package in 2 ways. Through the IIS Manager which will prompt you for the parameters or you can deploy using msdeploy.exe with the –setParamFile switch to specify the path to the SetParameters.xml file. In this case I could create a QA01.SetParameters.xml file along with a QA02.SetParameters.xml file to deploy my web to my two QA servers. How do we do this?

How connection strings are tokenized

You might be wondering how the connection strings are tokenized to begin with. With Visual Studio 2010 we released web.config transformations, which all you to write terse web.config transformations inside of files like web.debug.config/web.release.config. When you package/publish your web these transform files are used to transform your web.config based on what you expressed in the appropriate transform file. We have an MSBuild task TransformXml which performs the transformation. We use that same task to tokenize the connection strings. If you are interested in the details take a look at %ProgramFiles32%\MSBuild\Microsoft\VisualStudio\v10.0\Web\Microsoft.Web.Publishing.targets in the AutoParameterizationWebConfigConnectionStringsCore target.

Now what if you do not want the connection string tokenized?

Prevent tokenizing connection strings

If you want to prevent your web.config connection strings from being tokenized it’s pretty easy. All we need to do is the add a property to the build/package/publish process. We can do that in 2 ways. Edit the project file itself or create a file with the name {ProjectName}.wpp.targets where {ProjectName} is the name of your project. The second approach is easier so I use that. In my case it would be MvcApplication1.wpp.targets. The contents of the file are shown below.


    false


Note: You may need to reload the project in Visual Studio for this to take effect.

Inside of this file I have declared the property, AutoParameterizationWebConfigConnectionStrings, to be false. This is telling the Web Publishing Pipeline (WPP) that it should not replace replace the connection strings with tokens, instead leave them as they are.

Questions/Comments???

Other Resources


Comment Section

Comments are closed.


I just saw a post on twitter asking the question

Is there any easy way to see the underlying MSBuild command when building in VS2010? Want to see the MSDeploy params. @wdeploy?

This is actually pretty easy, but wouldn’t fit into 140 characters, so I decided to blog it.

One thing to know is that when you publish from Visual Studio, by default we use the MSDeploy (AKA Web Deployment Tool) Object Model in order to perform the deployment. We do this for performance and other reasons. Because of this there is no real msdeploy.exe command that is being issued. You can however change that behavior. This is controlled by an MSBuild property UseMSDeployExe which is false by default. In this case since Troy wants to see the command we will need to set that property to false. There are 2 ways in which you can do this. You can set it in the project file itself, or you can define it in a .wpp.targets file. I would recommend the second approach. What you need to do is to create a file with the name {ProjectName}.wpp.targets in the same directory as the project where {ProjectName} is the name of the Web Application Project (WAP). When you do this, during a build or publish the file is automatically imported into the build process. In my example I have a WAP named WebApplication1.csproj, so I created the file WebApplication1.wpp.targets and its contents are shown below.


    true
  

In the snippet above you can see that I defined the property to true. Now there is one more thing to do, publish the project. Once you publish the project, in the output window you will see the MSDeploy command which is being used. In my case I published the project to localhost to the Default Web Site/Test01 application path. You may have to copy the text from the output window into Notepad and search for msdeploy.exe. The command that was issued in my case is shown below (with formatting changes for readability).

"C:\Program Files (x86)\IIS\Microsoft Web Deploy\msdeploy.exe" 
-source:manifest='C:\temp\_NET\ThrowAway\WebApplication3\WebApplication1\obj\Debug\Package\WebApplication1.SourceManifest.xml' 
-dest:auto,IncludeAcls='False',AuthType='NTLM' 
-verb:sync 
-enableRule:DoNotDeleteRule 
-disableLink:AppPoolExtension 
-disableLink:ContentExtension 
-disableLink:CertificateExtension 
-setParam:kind='ProviderPath',
    scope='IisApp',match='^C:\\temp\\_NET\\ThrowAway\\WebApplication3\\WebApplication1\\obj\\Debug\\Package\\PackageTmp$',
    value='Default Web Site/Test01' 
-setParam:kind='ProviderPath',
    scope='setAcl',
    match='^C:\\temp\\_NET\\ThrowAway\\WebApplication3\\WebApplication1\\obj\\Debug\\Package\\PackageTmp$',
    value='Default Web Site/Test01' 
-retryAttempts=2 

So that’s it, pretty simple.

FYI, if you want more detail you can increase the MSBuild Output Window verbosity by going to Tools->Options->Projects and Solutions->Build and Run then specifying a different value for MSBuild project build output verbosity.

Sayed Ibrahim Hashimi - @sayedihashimi


Comment Section

Comments are closed.


One of the most commonly asked questions that I get is “How can I extend the build process for my solution?” In fact I was asked this soo much that 4 years ago (wow I’ve been dealing with MSBuild for far too long:) ) I wrote a blog post on Use MSBuild to build Solution files (no longer recommended technique) and that post to this day is one of the most frequently visited ones. Well in the 4+ years that have passed I’m glad to say that things have changed. The problem is that almost no one knows about it. Hopefully this blog post will be the start to that changing.

What’s under the covers

In all versions of Visual Studio, the solution file is not an MSBuild file. Which sucks for many of us. Essentially the solution build was like a black box.

Blackbox

Even in VS2010 it still kinda is, but there is a hook for us to extend it built in. Let me explain what happens when you build a solution using msbuild.exe. When you build a solution using msbuild.exe the solution file is converted to an MSBuild file in memory then that MSBuild file is used to build the solution itself. When you build from the command line here is the rough outline of the MSBuild project that gets built.


OK here I have left out the targets and properties because they are irrelevant to this discussion. Take a look at these import statements. There are two pairs of import statements ones that are imported before the build is defined and the imports which are after the build definition. Instead of looking at the first import statement lets look at the second one, because I think its more compelling and its easier to demo.

This statement is pretty simple, if a file with the name of before.ExtendSolutionBuild.sln.targets exists in the same directory as the ExtendSolutionBuild.sln file then it will be imported in at the top of the build file. Also there is a corresponding entry for after.ExtendSolutionBuild.sln.targets. In stead of getting into all the nitty gritty of why two exists let me just boil it down. You should place properties/items inside of the before targets file, and inside of the after .targets file you should place targets but its OK to put properties/items here as well. The most important thing to keep a note of is that you cannot place anything inside of the before file which relies on any properties/items defined in the build because they will not be available. Because of this most times you will just need an after targets file. So in my case I will create a file named after.ExtendSolutionBuild.sln.targets, this follows the pattern after.{SolutionFile}.sln.targets where {SolutionFile} is the name of the solution file mine happens to be ExtendSolutionBuild. Every solution has 4 targets that will be defined.

4 Targets on Every Solution file

  • Build
  • Rebuild
  • Clean
  • Publish

So let’s say that I want to extend the build file and inject two targets; GenerateCode and RunCodeAnalysis. Obviously I want the GenerateCode target to run before anything is built and the RunCodeAnalysis to be run after everything is built. So in my after.ExtendSolutionBuild.sln.targets file I place the following content.


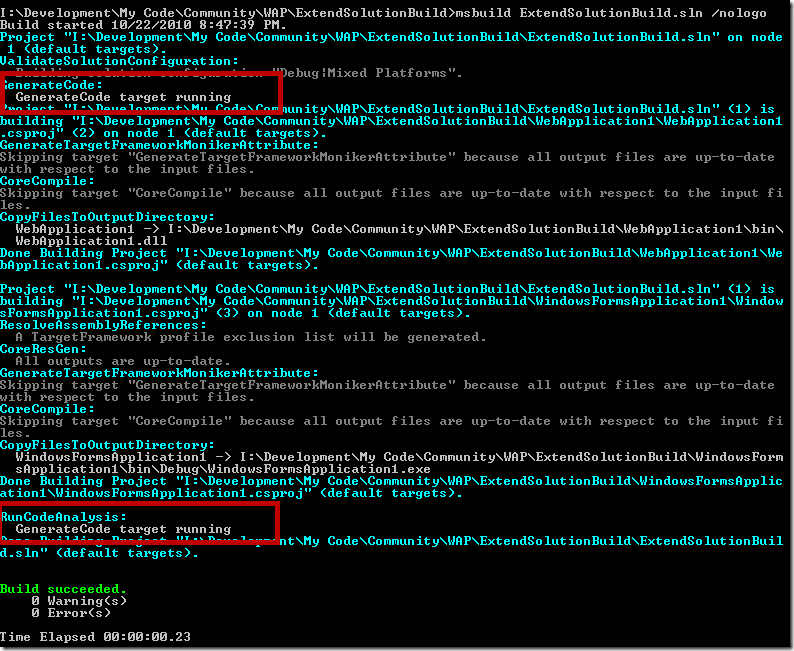
You can see here that I am using BeforeTargets=”Build” to make sure that the GenerateCode target is run before the Bulid target and also the RunCodeAnalysis target uses AfterTargets=”Build”. So now let’s see what happens when I build my solution from the command line using msbuild.exe.

ExtendSolution01

From the figure above you can see that the GenerateCode target was executed before the build process started and then the RunCodeAnalysis target was executed after the build. With MSBuild 3.5 and earlier this was simply not possible, and you would have had to write another build file to do these kinds of things for you. If you are building solution files from the command then you might be interested in the technique. I would be interested to hear you feedback and to see how you guys would use this feature.

ImportBefore/ImportAfter

Now let’s talk briefly about the two that we skipped. If you want an MSBuild file to be imported for every solution that is build using msbuild.exe for a given machine then you can place that file in one of the two folders below.

  • $(MSBuildExtensionsPath)\$(MSBuildToolsVersion)\SolutionFile\ImportBefore\
    • %ProgramFiles32%\MSBuild\4.0\SolutionFile\ImportBefore\
  • $(MSBuildExtensionsPath)\$(MSBuildToolsVersion)\SolutionFile\ImportAfter\
    • %ProgramFiles32%\MSBuild\4.0\SolutionFile\ImportAfter\

So if you place any file in either of those folders (which don’t exist by default) then they will automatically be imported for every solution file which builds on that machine using msbuild.exe. Typically you do not run into many times where you want to do this, but the times that you do then it is critical and really hard to work around without something like this. This is useful if you have a build machine and you want to perform a set of actions for every build.

Resources

Sayed Ibrahim Hashimi | @SayedIHashimi


Comment Section

Comments are closed.


Warning: What you see below feels hacky to me, but if you find it useful then use it

I have heard a lot of questions and confusion regarding web.debug.config and web.release.config. For example here is just one question on StackOverflow. The question states:

Hello, I want to use the web.config transformation that works fine for publish also for debugging.

When i publish a web app, visual studio automatically transforms the web.config based on my 
current build configuration. How can i tell visual studio 
to do the same when i start debugging. On debug start it simply 
uses the default web.config without transformation.

Any idea?

First let me explain, as I did to that question, the purpose of the files: web.config/web.debug.config/web.release.config.

web.config

This is the config file which developers should use locally. Ideally you should get this to be standardized. For instance you could use localhost for DB strings, and what not. You should strive for this to work on dev machines without changes.

web.debug.config

This is the transform that is applied when you publish your application to the development staging environment. This would make changes to the web.config which are required for the target environment.

web.release.config

This is the transform that is applied when you publish your application to the "production" environment. Obviously you'll have to be careful with passwords depending on your application/team.

The problem with transforming the web.config that you are currently running is that a transform can perform destructive actions to the web.config. For example it may delete a attributes, delete elements, etc.

Resolution

Ok, with that out the way not let’s see how we can enable what the question asker wants to do. To recap, when he builds on a particular configuration he wants a specific transform to be applied to web.config. So obviously you do not want to maintain a web.config file, because it is going to be overwritten. So what we need to do is to create a new file web.template.config, which is just a copy of web.config. Then just delete web.config by using Windows Explorer (don’t delete using Visual Studio because we do not want to delete it from the project). Note: If you are using a source control provider which is integrated into Visual Studio then you probably want to delete web.config from source control. Also with this we do not want to use web.debug.config or web.release.config because these already have a well defined role in the Web Publishing Pipeline so we do not want to disturb that. So instead we will create two new files, in the same folder as the project and web.template.config, web.dev.debug.config and web.dev.release.config. The ideas is that these will be the transforms applied when you debug, or run, your application from Visual Studio. Now we need to hook into the build/package/publish process to get this all wired up. With Web Application Projects (WAP) there is an extensibility point that you can create a project file in the same folder with the name {ProjectName}.wpp.targets where {ProjectName} is the name of the project. If this file is on disk in the same folder as the WAP then it will automatically be imported into the project file. So I have created this file. And I have placed the following content:


      $(PrepareForRunDependsOn);
      UpdateWebConfigBeforeRun;


Let me explain this a bit. I have created the CopyWebTemplateConfig target which will always copy web.template.config to web.config on build, even if you are not debugging your application in Visual Studio. This is needed because we still need to support the package/publish process of Visual Studio. Then I extended the property PrepareForRunDependsOn to include the UpdateWebConfigBeforeRun target. This property is used to identify the list of targets which needs to be executed before any managed project is run from Visual Studio. In this target I am using the TransformXml task to transform web.template.config, using the correct web.dev.***.config file. After that your app starts up using the correct web.config based on  your build configuration.

After that I have another target ExcludeCustomConfigTransformsFiles, which I inject into the package/publish process via the attribute BeforeTargets=”ExcludeFilesFromPackage”. This is needed because we do not want these files to be included when the application is packaged or published.

So that is really all there is to it. To explain the package/publish process a bit more for this scenario. When you package/publish web.debug.config or web.release.config, depending on build configuration, will still be used. But ultimately the file that it is transforming is web.template.config, so you may have to adjust depending on what you have in that file. Questions/Comments?

Sayed Ibrahim Hashimi - @sayedihashimi


Comment Section

Comments are closed.