I was on StackOverflow today and noticed a question along these lines “How to I create a target which is executed when CoreCompile is, and that is skipped when CoreCompile is skipped?” Below is my answer.

This is a tricky problem to solve for the general case, but it is pretty easy in your case because CoreCompile has special built in support for this scenario. Before I go into the details of how you can accomplish this with CoreCompile let me explain how it works in general.

Explanation of the general case

In MSBuild targets are skipped due to Incremental Building. Incremental Build is driven purely off of the Inputs and Outputs attributes on the Target itself. The inputs are a list of files that the target will "use" and the outputs are a list of files that are "generated" by the target. I'm using quotes because its a loose concept not a concrete one. To simplify it you can just treat inputs/outputs as lists of files. When the target is about to be executed MSBuild will take the inputs and compare the timestamps of them to the outputs. If all the outputs are newer then the inputs then the target will be skipped. (FYI If you want to know what happens when only some outputs are out-of-date read my blog athttp://sedodream.com/2010/09/23/MSBuildYouveHeardOfIncrementalBuildingButHaveYouHeardOfPartialBuilding.aspx).

In any case if you want a target to be skipped you have to craft your Inputs/Outputs correctly. In your case you want to skip your target whenever the CoreCompile is skipped, so at the surface it would seem that you could simply copy the Inputs/Outputs of CoreCompile but that doesn't work. It doesn't work because when CoreCompile is executed the files may be out-of-date but that target itself brings them up-to-date. Then when you target is executed since they are all up-to-date it will be skipped. You would have to copy the Inputs/Outputs and append an additional file to inputs/outputs which you target creates. This would ensure that your target wouldn't get skipped during that first pass.

Specific solution for CoreCompile

If you take a look at the project file you will see towards the bottom that the file Microsoft.Common.targets is Imported, this file will then import the language specific .targets file. For example it will Import either Microsoft.CSharp.targets or Microsoft.VisualBasic.targets (if you are using C# or VB). In those .targets files you will find CoreCompile defined. In the definition for CoreCompile you will find the following at the end.

This will call all the targets defined in the TargetsTriggeredByCompilation property. So if you want your target to be called whenever CoreCompile is executed you can extend that property. Here is how to do that.


    $(TargetsTriggeredByCompilation);
    MyCustomTarget


In this case I define the property TargetsTriggeredByCompilation and I append MyCustomTarget to it. It's very important that you include the $(TargetsTriggeredByCompilation); there, if you don't then you won't be appending but overwriting. So if anyone else used this technique you'd wipe out their target.

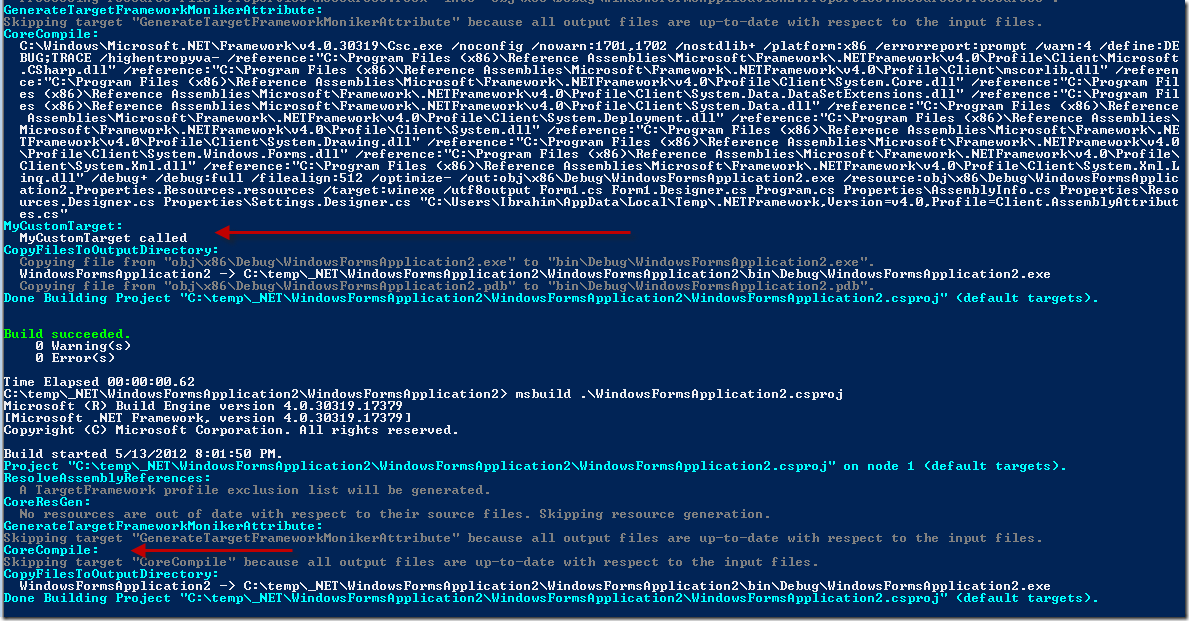
Below is an image showing where I build once and CoreCompile and MyCustomTarget are executed. Then the second build CoreCompile is skipped any MyCustomTarget is never called.

build-output


Sayed Ibrahim Hashimi @SayedIHashimi


Comment Section

Comments are closed.


If you have used the Visual Studio web publish in either VS 2010 or VS 11 to create Web Deploy packages then you probably know that we parameterize connection strings in web.config automatically. In case you are not familiar with Web Deploy parameters, they are a way to declare that you want to easily be able to update a value of something when publishing the package later on. Connection strings are good examples of something which typically needs to be updated during publish.

As I previously stated if you create a Web Deploy package in Visual Studio we will automatically create Web Deploy parameters for all your connection strings in web.config. Earlier today I saw a question on StackOverflow asking how to parameterize connection strings in non-web.config files (question actually asked something else, but I think this is what he’s really wanting). I created a sample showing how to do this. Below is what the connectionStrings element looks like in web.config.

And here is connectionStrings.config


In order to parameterize these connection strings you will have to extend the Web Publish Pipeline. To do that create a file named {project-name}.wpp.targets in the root of the project in which you are working (for VS 11 projects you can place all this directly inside of the .pubxml files). This will be an MSBuild file which will get imported into the build/publish process. Below is the file which needs to be created.


      XmlFile
      connectionStrings.config$
      /connectionStrings/add[@name='ApplicationServices']/@connectionString
      Connection string for ApplicationServices
      data source=(localhost);Initial Catalog=AppServices
      SqlConnectionString


      XmlFile
      connectionStrings.config$
      /connectionStrings/add[@name='OtherConnectionString']/@connectionString
      Connection string for OtherConnectionString
      data source=(localhost);Initial Catalog=OtherDb
      SqlConnectionString


Here you can see that I am creating values for MSDeployDeclareParameters. When you package/publish this item list is used to create the MSDeploy parameters. Below is an explanation of the metadata values each contain.

  • Kind = for this case it will always be Xmlfile, learn more
  • Scope = a regular expression to the file which needs to be modified
  • Match = an XPath expression to the attribute/element to be updated
  • Description = optional description (this will show up in the IIS manager if the pkg is imported)
  • DefaultValue = optional default value for the for the parameter
  • Tags = optional, for connection strings use SqlConnectionString

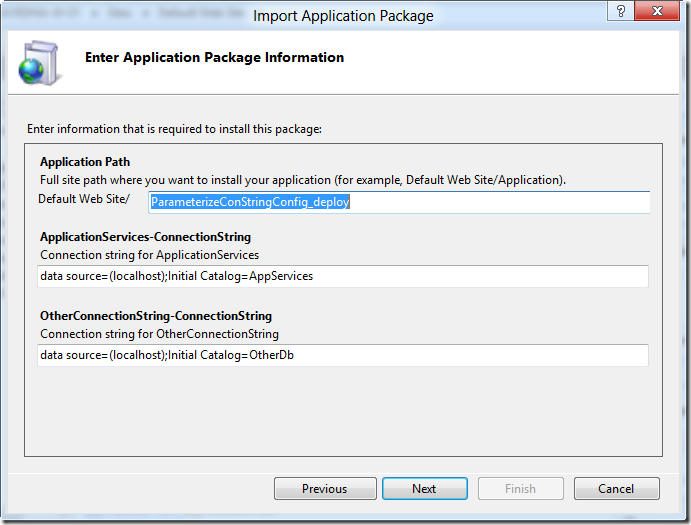
After you create this file you will need to close/re-open VS (it caches imported .targets files). Then you can create a web deploy package. When you do so these new parameters will be declared. In my case I then imported this in the IIS manager and here is the dialog which shows up for the parameters.

SNAGHTML94cce08

As you can see the Application Path parameter is shown there as well as my custom connection string values. When I update the values in the text box and opened connectionStrings.config on my web server they were the values I entered in the dialog box.

FYI I have uploaded this sample to my github account at ParameterizeConStringConfig.

Sayed Ibrahim Hashimi @SayedIHashimi


Comment Section

Comments are closed.


\I receive a lot of questions regarding web.config transforms, which have existed in Visual Studio since 2010, and wanted to clear up the support that we have in this area. These transforms show up in the solution explorer underneath web.config as shown in the image below.

image

Since the names of these transforms include the build configuration many people expect that web.config will be transformed when they start debugging (F5) or run the app (CTRL+F5) in Visual Studio. But sadly this is not the case. These transforms are kicked in only when the web is packaged or published. I totally agree that this would be awesome, and I even blogged about how to enable it at http://sedodream.com/2010/10/21/ASPNETWebProjectsWebdebugconfigWebreleaseconfig.aspx. It may seem like it would be really easy for us to include this support in the box, but unfortunately that is not the case. The reason why we are not able to implement this feature at this time is because a lot of our tooling (and many partners) relies on web.config directly. For example when you drag and drop a database object onto a web form, it will generate a connection string into the web.config. There are a lot of features are like this. It is a significant investment for us to make a change of this level. We were not able to get this done for Visual Studio 11, but it is on our radar and we are looking to see what we can do in this area in the future.

Sayed Ibrahim Hashimi @SayedIHashimi


Comment Section

Comments are closed.


Have you ever tried to perform an operation on a file (i.e. delete) just to be faced with an error relating to the fact that an application is locking the file? This happens to me a lot, including just now. I was writing some code and tried to switch branches and was given the error below.

image

So I closed down Visual Studio as well as IIS Express as I figured those were the ones which had the lock on the file, and tried again (a few times actually Smile ) but continued to receive the error above. In order to determine which file had a handle open to that file I downloaded Handle from the sysinternals suite. (I actually already had the items downloaded inside of a Dropbox share which I use between multiple computers.) I then executed the command handle.exe nlog and the results are shown below. Note: I had to open a command prompt window to run handle.exe, for some reason it wasn’t working from a PowerShell prompt.

image

As you can see there was a rogue devenv.exe process holding on to the file. After killing the process I was able to proceed.

Sayed Ibrahim Hashimi @SayedIHashimi

Comment Section

Comments are closed.


I’ve been using Git for my open source projects recently and have been loving it. If you are like me and you like using the PowerShell prompt instead of the normal command prompt then you have to install posh-git. posh-git extends the PowerShell prompt to include information about the git repository and also makes remote operations simpler. After using git in this way I quickly noticed that the colors were not very readable. For example take a look at the screen shot below.

image

In the image above you can see that the text in dark red is difficult to read. This text comes from two different places. For the text relating to modified and untracked files, that is coming directly from git.exe and for the text after [master that is coming from posh-git. In order to make this easier to read we have to modify the color settings for both.

Modifying text color settings for git.exe

When using git.exe you can configure the color settings using git config. There are a bunch of color settings which you can control, which are all listed on the manpage for git config. In my case I want to update the color for modified files and untracked files, those can be configured with color.status.changed and color.status.untracked respectively. The color options that you have to pick from include:

  • normal
  • black
  • red
  • green
  • yellow
  • blue
  • magenta
  • cyan
  • white

In my case I wanted the text for those settings to be the same color as the master text in the image above. In order to set the color you can use the syntax:

git config “foreground-color background-color attribute”

The attribute value can be any of these values; bold, dim, ul, blink and reverse.

In my case I executed the following command:

git config --global color.status.changed "cyan normal bold"
git config --global color.status.untracked "cyan normal bold"

Notice that I used the --global switch to indicate that I wanted the settings to be persisted in the global .gitconfig file instead of the one for the specific project that I was working on. So this got me to:

image

Almost there, now I need to modify the color for the summary provided by posh-git. A good resource for more info here is http://git-scm.com/book/ch7-1.html#Colors-in-Git.

Modifying text color for posh-git

posh-git stores all of it’s color settings in the $global:GitPromptSettings variable, you can see them declared in the GitPrompt.ps1 file. If you want to change the values for the colors you should not edit that file (that file might get updated later). Instead all you need to do is to override the value for the particular color after posh-git has been loaded. The best way to do this is to edit your PowerShell profile. This file is executed every time you open a PS prompt. You can find the location of this file by executing $profile in a PS prompt. In that file you should see a line initializing posh-git in my case it was:

. 'G:\Data\Development\OpenSource\posh-git\profile.example.ps1'

You should place your customizations after this statement. So in my case I wanted to change the summary text from dark red to yellow, so I added the following lines to my PS profile.

$global:GitPromptSettings.WorkingForegroundColor    = [ConsoleColor]::Yellow
$global:GitPromptSettings.UntrackedForegroundColor  = [ConsoleColor]::Yellow

I closed the PS window and opened a new one and now here is the result.

image

Now that’s better!

FYI if you are looking to install posh-git you can follow a simple walk through on Phil Haack’s blog at Better Git with PowerShell.

I’d like to thank Brad Wilson and Keith Dahlby for pointing me in the right direction regarding these settings.


Sayed Ibrahim Hashimi | @SayedIHashimi

My Github account


Comment Section

Comments are closed.


<< Older Posts | Newer Posts >>