Sayed Ibrahim Hashimi
Sayed Ibrahim Hashimi
Ok,
I thought this was pretty straight forward but I had two people ask me about this recently so I thought I'd post a blog discussing it. There are many occasions where you'd like to create a Form that and use it as the base for inheritance by other forms. At the same time you'd like to still be able to use the Visual Studio Designer to design your Forms that inherit from that. In order to achieve this you'll have to create what's called an Inherited Form. You can use this form many things, including Visual Inheritance.
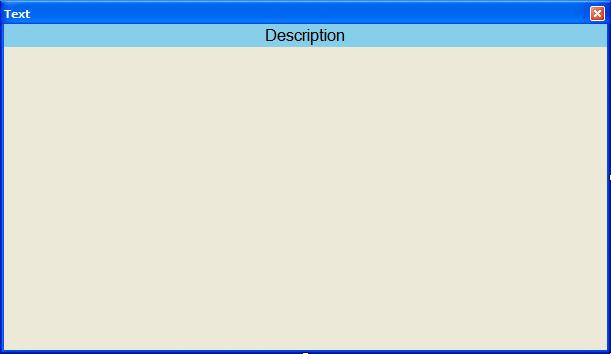
For this entry I have created a very simple example, you can download the files at the bottom of this entry if you are interested. To re-create the sample follow along. I created a new C# Windows Form Application. Then renamed the Form1.cs file to MyBaseForm.cs. This is the class that I would like to use as the base class for other forms. At this point I added a docked label to the form and add some specific stylistic changes to it. The resultant form is shown below.

As you can see from the image above there's not much to this form, but this is just a sample :-).
Now I'd like to provide an easy way to customize the description in my new label. To do this I'll create a new property and give it some attributes to be used by the Designer. That property is shown below.
[Description("Description")]
[Category("Form Base")]
public string Description
{
get
{
return this.labelDescription.Text;
}
set
{
this.labelDescription.Text = value;
}
}
This is just a normal property with the exception that It has the System.ComponentModel.Description attribute as well as the System.ComponentModel.Category attribute. The Description the name of this attribute that will be shown in the properties grid of the designer, and the category is the category that it will be in. If the Category is not present then it will default to the Misc category. Let's see how this makes a difference. Keep in mind that this is the simplest type of integration with the designer that you can achieve. The possibilities are endless.
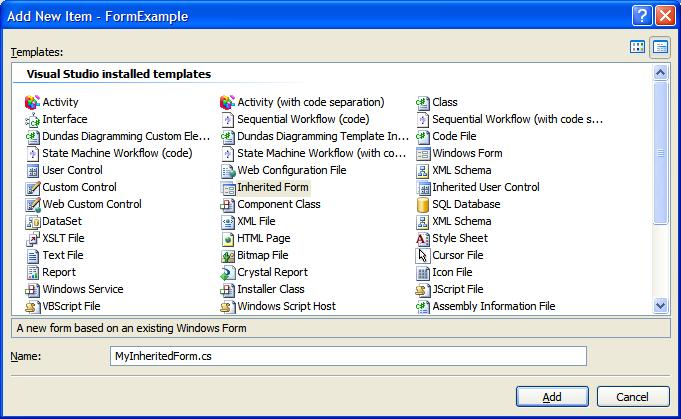
At this point we should build the project. Before we can create the Inherited Form we must build the project, otherwise you'll get an error stating that no assemblies are present which contain a Form. So after the build has completed we want to add a new item to the project. One method for this is Right Click on the Project->Add->New Item. At this point you'll be presented a dialog to select the template type that you want to create. From this list select "Inherited Form". Have a look at the image below.

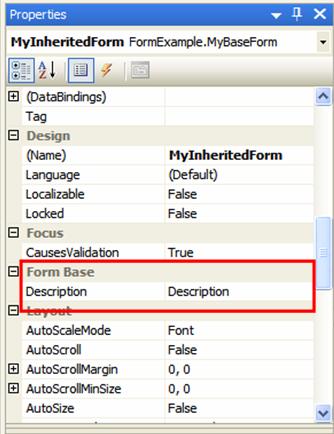
I'll call the new form MyInheritedForm.cs. After that you're given a dialog to select which Form class it should inherit from, then your form is created. For clarity about the designer integration here is a view of the properties grid from the MyInheritedForm designer view.

As you can see we have the Description property available in the Form Base category, just what we wanted! Now if the developer changes the value on this property then the text in the description label will be updated. Like I said earlier the designer integration is very capable, and this is the simplest form. Using these Inherited Forms for simple things like Visual Inheritance is a very clean way of mainting visual changes in a single form. But don't view this as the only use of Inherited Forms.
Sayed Ibrahim Hashimi
Comment Section
Comments are closed.
If you are using MSBuild 4.0 (i.e. Visual Studio 2010) then you can now use a new technique that I outline at MSBuild: Extending the solution build
Over the past few months I have noticed a need by many people to place some specific steps into the process that is used when MSBuild is invoked on solution files. When people research this topic they quickly discover that the Visual Studio Solution file is NOT in the MSBuild format. MSBuild is able to consume these files, but you are not able to actually extend the process used for the solution as a whole.
Recently there was an entry at the MSDN MSBuild Forum related to this issue. So I figured I'd put my two cents into the discussion as well.
For some background, when MSBuild needs to build a solution file, it is converted in memory to an MSBuild project file. If you have the envrionment variable msbuildemitsolution set to the value of 1. Then this file will be written out to a file. The file name will be SOLUTION_NAME.sln.proj.
Ok, previously there was another entry on the MSDN Forum about how to set an Envrionment variable using MSBuild. To let you know where I'm going with this, I'd like to have MSBuild be responsible for creating this file and for me to add steps before and after the building of my solution. The task to create the envrionment variable is shown below, this was written by Keith Hill and is at the previous link
using System;
using System.Collections.Generic;
using System.Text;
using Microsoft.Build.Framework;
using Microsoft.Build.Utilities;
namespace Sedodream.MSBuild
{
///
/// Taken from http://forums.microsoft.com/MSDN/ShowPost.aspx?PostID=73225&SiteID=1
/// Written by Keith Hill
///
public class SetEnvVar : Task
{
private string _variable;
private string _value;
[Required]
public string Variable
{
get { return _variable; }
set { _variable = value; }
}
[Required]
public string Value
{
get { return _value; }
set { _value = value; }
}
public override bool Execute()
{
Environment.SetEnvironmentVariable(_variable, _value);
return true;
}
}
}
You can download this file at the bottom of this entry (SetEnvVar.cs).
So we need to take this file and create an assembly from it. Make sure to add Microsoft.Build.Framework and Microsoft.Build.Utilities to your project's references. Oh yeah you could skip this part of the process if you just make sure to set that envrionment variable, but that's no fun.
After you create this assembly place in a known location. I called this assembly Sedodream.MSBuild.dll and placed it in a folder named tasks one folder above the solution I was trying to build.
Now that we are done with that we need to create the msbuild file that will do the rest of the work for us.
The whole file is shown below and can be downloaded at the end of this blog (DreamCatcher_SlnBuild.proj)
<Project InitialTargets="SetMSBuildEmit"
DefaultTargets="BuildSolution"
xmlns=http://schemas.microsoft.com/developer/msbuild/2003>
<PropertyGroup>
<SharedTasksDir>..\tasks\SharedTasksDir>
<EnvAssemblyFilename>Sedodream.MSBuild.dllEnvAssemblyFilename>
<BuildSolutionDir>.\BuildSolutionDir>
PropertyGroup>
<ItemGroup>
<SlnFiles Include="$(BuildSolutionDir)*.sln"/>
ItemGroup>
<UsingTask AssemblyFile="$(SharedTasksDir)$(EnvAssemblyFilename)" TaskName="SetEnvVar"/>
<Target Name="SetMSBuildEmit">
<SetEnvVar Variable="msbuildemitsolution" Value="1"/>
Target>
<Target Name="BuildSolution" DependsOnTargets="SetMSBuildEmit">
<MSBuild Projects="@(SlnFiles)" Targets="Build"/>
<CreateItem Include="*.sln.proj">
<Output TaskParameter="Include" ItemName="SolutionMSBuildFiles"/>
CreateItem>
<MSBuild Projects="$(MSBuildProjectFile)"
Targets="DoBuildSolution"
Properties="@(SolutionMSBuildFiles->'theSolution=%(Filename)%(Extension)')"/>
Target>
<PropertyGroup>
<DoBuildSolutionDependsOn>
BeforeDoBuildSolution;
CoreBuildSolution;
AfterDoBuildSolution
DoBuildSolutionDependsOn>
PropertyGroup>
<Target Name="DoBuildSolution" DependsOnTargets="$(DoBuildSolutionDependsOn)" />
<Target Name="BeforeDoBuildSolution">
<Message Text="*****Before building your solution*****" Importance="high"/>
Target>
<Target Name="CoreBuildSolution">
<MSBuild Projects="$(theSolution)" Targets="Build"/>
Target>
<Target Name="AfterDoBuildSolution">
<Message Text="###After building your solution######" Importance="high"/>
Target>
Project>
Now all you need to do is to place this file into the folder that contains your solution and call msbuild on it with:
>msbuild.exe DreamCatcher_SlnBuild.proj /t:BuildSolution
The DefaultTargets is set to BuildSolution so you can take that off actually.
The are many advantages to this solution like:
1) You extend the solution build process in similar ways as extending the project build proces
2) You can re-use any existing MSBuild tasks
3) You can add more steps to the build process easily
4) You can place this file into source control and all team members can use it.
If you need more info please let me know, I would explain further now but I'm not feeling very well currently.
Sayed Ibrahim Hashimi
Comment Section
Comments are closed.
There are many situations where you are building a solution that contains custom user controls and custom forms that other classes are dependent on. In a project that I'm currently working on we have this need as well. I have created a User Control, this control is kind of like the Visual Studio toolbox. This control is in a project that a few projects have a dependency on. In the main form this control is placed onto the form using the VS Designer. Sometimes when I need to change how the main form looks like, I get the following error.
*************************************************************************************************
|
|
One or more errors encountered while loading the designer. The errors are listed below. Some errors can be fixed by rebuilding your project, while others may require code changes. |
|
| |
|
| |
**************************************************************************************************************************
I knew that all the code for the main form and its dependencies were OK because, I had viewed the form recently & everything builds fine. I ran into this problem a while ago when I was writing forms using Managed C++ with VS 2003. I assumed that the problem had been resolved, since I haven't run into it while using VS 2005 & C#, but seems like I was wrong.
I did a search and found that there are a few work items at the MSDN Product Feedback Center, in particular there is this item which is closely related. Based on some of the workarounds there and some other information that I have found it seems like the soultion is to
- Close all open files in Visual Studio
- Close Visual Studio
- Delete all temporary files
- Rebuild solution
- Open form
Doing all of this is a hassel, but better then not being able to visually design your forms! To reduce the pain of this process I have created an MSBuild file which will find and delete all the file located under every bin and obj folder. If your solution contains a different OutputPath which is not under the bin folder, or a folder other than obj for the BaseIntermediateOutputPath, then you'll need to edit this file. Also if for some reason you have files under these directories that you do not want to delete then please don't use this file because that would just be sily.
You can download the file form the link at the bottom of this page (DeleteTempFiles.proj). We will discuss its content and how to use it now. The file content is shownn below.
<
Project xmlns="http://schemas.microsoft.com/developer/msbuild/2003" DefaultTargets="CleanFiles"><ItemGroup>
<FilesToDelete Include="**\bin\**\*;**\obj\**\*"/>
ItemGroup>
<Target Name="CleanFiles" DependsOnTargets="ShowFiles">
<Delete Files="@(FilesToDelete)" ContinueOnError="true" />
Target>
<Target Name="ShowFiles">
<Message Text="Files%0d%0a:@(FilesToDelete,'%0d%0a')"/>
Target>
Project>
There are two targets in this file, the CleanFiles target and the ShowFiles target. As you might expect the CleanFiles target deletes all of those files and the ShowFiles target simply prints a list of all the files that will be deleted. You can use this to help determine if you should execute the CleanFiles target. You should place this file in a folder at the top of the solution heirarchy. If you have projects in different locations other then under the same path then you'll have to modify the FilesToDelete declaration to pick those up as well. Before you run this file you should close all open files in Visual Studio and then exit out of Visual Studio. Following this open the Visual Studio Command Prompt, navigate to the folder which has the DeleteTempFiles.proj file. To show which files will be deleted you can do:
>msbuild.exe DeleteTempFiles.proj /t:ShowFiles
To delete these files:
>msbuild.exe DeleteTempFiles.proj /t:CleanFiles
Following this open Visual Studio, rebuild the solution and then open the form in the designer. If all goes well you should see your form again!
Comment Section
Comments are closed.
Previously I posted about a bug in MSBuild that doesn't allow you to create a property (or item) and use this in a target that is invoked with the CallTarget task. There is a way to invoke the calling target with the new value of the Property and that is to use the MSBuild Task to achieve this. This task allows you to use MSBuild to execute a specified set of targets. Using this task you can also send a set of properties that you'd like for it to use when building the project. So to workaround our previous issue, you must use the MSBuild task and pass in the properties that you desire. Have a look at the workaround project file:
<
Project xmlns="http://schemas.microsoft.com/developer/msbuild/2003" DefaultTargets="Create"><Target Name="Create">
<CreateProperty Value="E:\Data">
<Output TaskParameter="Value" PropertyName="DestFolder" />
CreateProperty>
<CreateItem Include="*.*">
<Output TaskParameter="Include" ItemName="TestFiles"/>
CreateItem>
<CallTarget Targets="Print"/>
<MSBuild
Projects="$(MSBuildProjectFile)"
Targets="Print"
Properties="DestFolder=$(DestFolder)"
/>
Target>
<Target Name="Print">
<Message Text="Print target called"/>
<Message Text="Dest: $(DestFolder)"/>
<Message Text="TestFiles: @(TestFiles)"/>
Target>
Project>
Here is the output when you execute the default target (Create)
Project "C:\Data\Dreamcatcher_NET\Dreamcatcher\Sample_Workaround.proj" (default targets):
Target Create:
Target Print:
Print target called
Dest:
TestFiles:
__________________________________________________
Project "C:\Data\Dreamcatcher_NET\Dreamcatcher\Sample_Workaround.proj" is building "C:\Data\Dreamcatcher_NET\Dreamcatcher\Sample_Workaround.proj" (Print target(s)):
Target Print:
Print target called
Dest: E:\Data
TestFiles:
Build succeeded.
0 Warning(s)
0 Error(s)
That's kind of interesting how the property & item value are immediately available but not when you use the CallTarget task. At least you can get around the Property passing issue somewhat. There are some key limitations to this method, the most important of which is the fact that you must specify which properties to send to that target, and there is no way to send all the properties. And of course you can't send any items. The good thing about this issue is that I don't think this will impact a lot of people. You are not very likely to need this functionality, and there are ways around it. Namely if you use target dependencies you can execute the targets without the need to use the CallTarget task, but it would be convenient if it worked.
You can download the workaround file from the link below, if this doesn't fix your situation I'd be interested to know more about it. Maybe there is a way around it that does. Also I have updated the MSDN Product Feedback item, I added this workaround.
Comment Section
Comments are closed.

Comments are closed.