Previously I was thinking of writing some more material on MSBuild. Since then I have written about 60 pages of new material, and have actually decided to focus on some new topics. Because of this I will release a mulit part series that consists of this material that I have written. I think that I've come up with some pretty good content and would like to make it available. It still requires polishing and changes for this new format. So this is the first in this series of post.
These first posts will be from the MSBuild Quick Start chapter
In this post we will discuss the topics highlighted.
MSBuild Quick Start
- Project file details
- MSBuild Properties & Targets
- Items
- Simple Conditions
- Default / Initial targets
- Command line usage
- Before / After build
- Clean
MSBuild Quick Start
When you are learning a new subject it's exciting to get just dive right into it and get your hands dirty. In this section I will describe all the key elements you will need to know to get started using MSBuild. If you are already familiar with MSBuild feel free to skip this section, all of the material covered here will be covered in later sections as well.
The topics that we will cover in this section include; structure of an MSBuild file, Properties, Targets, Items and invoking MSBuild. With that being said, let's get started.
Project file details
An MSBuild file, typically called an MSBuild project file is really an XML file. These XML files are described by two XMLSchema Documents (XSD). These are located in the %WINDIR%\Microsoft.NET\Framework\v2+\MSBuild folder. Where v2+ is the version folder for .NET 2 and above. In this text I will assume you are using .NET 2.0 unless specified. In those folders you will find Microsoft.Build.Commontypes.xsd, this is the file that describes commonly found element in Visual Studio generated project files. Also this file includes the Microsoft.Build.Core.xsd document. This document describes all the fixed elements in an MSBuild project file. The simplest MSBuild file would contain the following:
This is the XML fragment that will identify this as an MSBuild file. Inside these tags is where all your content will be placed. Specifically we will be declaring Properties,Items, Targets and a few other items directly under the Project element. When you build you need to know what you are building, typically contained in Items and values that drive the build process, typically stored in Properties. We will now discuss how to declare properties, and we will cover Items later in this chapter.
MSBuild Properties & Targets
MSBuild properties are simply key value pairs, the key for the property is the name that you will use to refer to the property, and the value is, simply, its value. When you declare static properties they are contained in a PropertyGroup element directly under the Project element. Below is an example.
In the snippet above I have declared two properties; AppServer and WebServer with the values '\\sayedApp' and '\\sayedWeb' respectively. You can create as many PropertyGroups under the Project tag as you desire. The above fragment could have been defined as the one shown below.
If you create a sample project in Visual Studio, you will notice that there are many properties declared. These properties contain values that will be used throughout the build process. Below is a fragment from a Windows Application project that I created using Visual Studio.
....
You can see that things such as the output type, name of the assembly and many other values are defined in properties. Defining properties is great, but completely useless without being able to use them. So we will move on to Target declarations.
MSBuild has execution elements, those are Tasks and Targets. A Task is the smallest unit of work in and MSBuild file, and a Target is simply a sequential set of tasks. A Task must always be contained within target. Below is a sample that shows you the simplest MSBuild file which contains a target.
In this sample we have created a new Target named HelloWorld, but it actually doesn't perform any work at this point because it is empty. When MSBuild is installed you are given many tasks out of the box. You can find a list of these tasks at MSBuild Task Reference (http://msdn2.microsoft.com/en-us/library/7z253716.aspx). We will now use the Message task. The message task is used to send a message to the logger(s) that are listening the build process. In many cases this means that a message is sent to the console that is executing the build process. When you invoke a task in an MSBuild file you can pass it input parameters by inserting XML attributes with values. These attributes will vary from task to task depending on what inputs the task is expecting. From the documentation for the Message task (http://msdn2.microsoft.com/en-us/library/6yy0yx8d.aspx) you can see that is accepts a string parameter named Text. The snippet below shows you how to use the Message task to send the value 'Hello World' to the logger(s).
Now we will verify that this works as expected. To do this place the above text into a file named HelloWorld.proj. Now open a Visual Studio Command Prompt and go to the directory that contains the newly created file. The shortcut for this prompt is in the Visual Studio Tools folder under the Visual Studio folder in the Start menu. The command that you'll use is the msbuild.exe command. The basic usage for the command is
msbuild [INPUT_FILE] /t:[TARGETS_TO_EXECUTE]
So our command would be
msbuild HelloWorld.proj /t:HelloWorld
In the above we are saying, build HelloWorld.proj by executing the HelloWorld target. The result of this command is shown in the image below.
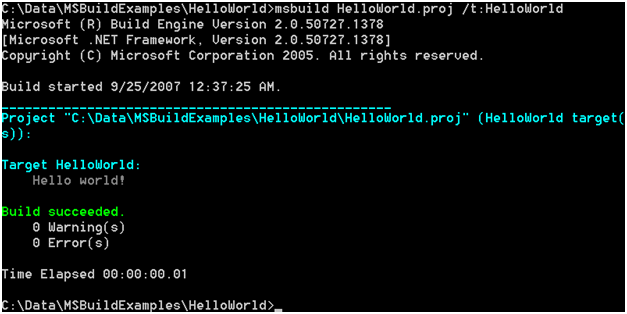
In the image above we can see that the HelloWorld target is executed and that a message 'Hello World!' was displayed on the console. Now let's see how we can use properties within other properties. Have a look at the simple project file shown below.
In the snippet above we can see that there are three properties that have been declared. On both the Configuration & Platform properties there is a Condition attribute. We will discuss these attributes later in this chapter. The remaining property, DropLocation, is defined using the values of the two previously declared items. Let's take a close look at that. The DropLocation Property has three components; a constant value and two values that are derived from the Configuration & Platform properties. When the MSBuild engine sees the $() notation it will replace that with the value of the specified properties. So the qualified DropLocation value would be: '\\sayedData\MSBuildExamples\Drops\Debug\AnyCPU\'. You can verify that by executing the PrepareFilesForDrop target from the Visual Studio Command Prompt. The reference for properties can be found at http://msdn2.microsoft.com/en-us/library/ms171458(VS.80).aspx.
When you use MSBuild there are a handful of properties that are available to you out of the box, that cannot be modified. These are known as Reserved properties. In the table below you will find all the Reserved properties.
Name | Description | Example |
MSBuildProjectDirectory | Full path to the location of project file. | C:\MSBuild\MSBuild1\MSBuild1 |
MSBuildProjectFile | Filename of the project file, including extension. | MSBuild1.csproj |
MSBuildProjectExtension | Extension of the project filename, including the initial dot. | .csproj |
MSBuildProjectFullPath | Full path to the project file including the filename. | C:\MSBuild\MSBuild1\MSBuild1\MSBuild1.csproj |
MSBuildProjectName | Name of the MSBuild project file excluding the file extension. | MSBuild1 |
MSBuildBinPath | Full path of the .NET Framework MSBuild bin directory. | %WINDIR%\Microsoft.NET\Framework\v2.0.50727 |
MSBuildProjectDefaultTargets | The value for the DefaultTargets attribute that is in the Project element. | Build |
MSBuildExtensionsPath | Full path to the MSBuild folder located in the Program Files directory. This is a great place to keep commonly used items. | C:\Program Files\MSBuild |
You would use these properties just as you would properties that you have declared in your own project file. To see an example of this you can look at Visual Studio generated project files. When you initially create a new C# project you will find the import statement
Items
Building applications usually means dealing with many files. Because of this there is a specific construct that is used when dealing with files, and that is what's called Items. Items are usually file references, but they actually can be used for other purposes as well. If you create a project using Visual Studio you may notice that you see many PropertyGroup elements as well as ItemGroup elements. The ItemGroup elements contain all the defined items. When you define a Property you are declaring a key/value pair, but when you declare an Item you declare Items that can potentially have many elements inside of them. Let's see the syntax in action.
In this file, ItemsSimple.proj, there is an ItemGroup that has a sub element SoultionFile. The ItemGroup is the element type that all statically declared Items must be placed. The name of the sub elements are the names of the actual Items. In the above sample we have declared an Item names SolutionFile. The SolutionFile element has an attribute attached to it, the Include attribute. This attribute determines what actual entries are contained within the Item. This is because an Item can contain multiple entries. The Include attribute can contain a single value or a comma separated list of values. We will see this demonstrated later in this chapter.
In the target, PrintSolutionInfo, we can see the Item at use. Item evaluation syntax varies from Property syntax. To get the value of an item you will use the @() notation. The result of the build file, ItemsSimple.proj, is shown in the image below.

In this case the Item, SolutionFile, contains a single entry. Now let's see the result if there were multiple files included in the item. The snippet below shows the modified version of the ItemsSimple.proj file.
When you invoke the PrintCompileInfo target you will get the result 'Compile: Form1.cs;Form1.Designer.cs;Program.cs;Properties\AssemblyInfo.cs'. The Message tasks' Text parameter is a string value so the item is automatically converted, by MSBuild, into a string then passed to the task. This is done by concatenating all the entries separated by a ;. Later in the book I will demonstrate how you can customize this conversion process. Since the Include attribute can accept either one or many entries we could have actually defined the Compile Item as follows:
When a Property declaration appears after a previous declaration, this results in the value of the Property to be overridden. Items act differently from this; you cannot remove entries or overwrite values contained in an Item. You can only append to them. This is why both of the above statements are equivalent. Typically Items refer to existing files, if this is the case you can use wild cards to automatically include whatever files meet the conditions contained in the include statement. You can use three wildcard elements with MSBuild: ?, *, and **. You can use ? to replace a single character with any character. For example, the include declaration Include="c?r.cs" would include the files car.cs, cbr.cs, ccr.cs, and so on. The * element can replace any location with zero or more characters. To change the previous example, Include="c*r.cs" would include car.cs, caar.cs, cr.cs, colorer.cs, and so on. The ** notation tells MSBuild to search the directories recursively for the pattern. For example, Include="src\**\*.cs" would include all the files under the src directory with .cs extensions.
Another difference between Properties and Items is that Items can have metadata. Actually when you declare an Item each entry has a set of metadata associated with it out of the box. The table below outlines the well known metadata.
Name | Description |
FullPath | Full path of this item including the filename. |
RootDir | Root directory to which this item belongs. |
Filename | Filename for this item, not including the extension. |
Extension | File extension for this item. |
RelativeDir | Path to this item relative to the current working directory. |
Directory | Directory of the item without the root directory. |
RecursiveDir | Used for items that were created using wildcards. This would be the directory that replaces the wildcard(s) statements that determine the directory. |
Identity | Value for the item specified in the Include attribute. |
ModifiedTime | Time this item was last modified. |
CreatedTime | Time the item was created. |
AccessedTime | Last time this item was accessed. |
The basic usage for accessing metadata values is described by the template shown below.
@(ITEM_NAME->'%(METADATA_NAME)')
Where ITEM_NAME is the name of the item and METADATA_NAME is the name of the metadata that you would like to retrieve. Consider the following example. Assume that you have the following files in a directory; Class1.cs,Class2.cs,Class3.cs and Class4.cs. The following project file, MetadataExample01.proj, shows how to access the Compile Items' Fullpath metadata.
If you execute the PrintCompileInfo target you will see the following result.
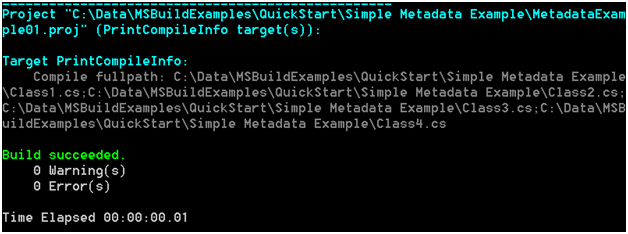
From the output shown in the figure above we can see that the full path for all the Compile items was sent to the console. Accessing the metadata in this manner is given the term Item Transformation. We will discuss transformations in much more detail in a later chapter. Before we move on to discuss MSBuild Conditions take a look at a simple Windows Application project file that was generated by Visual Studio. You should see many things that you recognize.
Comments are closed.