Ok there is this hidden feature of MSBuild its called output inferral. This is used when a target is skipped due its Inputs & Outputs (incremental building) but the target creates properties and items. Eventhough the inputs and outputs are up to date the side effects (properties & items) may change the rest of the build process. Because of this output inferral is required. When a target is skipped MSBuild will inspect the target for properties & items that were created and create those. This will ensure that other targets down the chain will not be affected by the target being skipped. In MSBuild 3.5 there is a new property on the CreateProperty task, this property is ValueSetByTask. The whole purpose of this is to only be used when you do not want its value to be inferred. By using this property instead of Value you would be guaranteed that the target was actually executed. Let's clear this up with an example take a look at the project file shown below.


Inputs="$(MSBuildProjectFullPath)"
Outputs="$(MSBuildProjectFullPath)">


ValueSetByTask
"/>


3333


In this file (you can download from link at end) there are two targets, SetupValues and PrintValues. PrintValues depends on SetupValues. Because the Inputs and Outputs on SetupValues point to the same file the target will always be skipped. But we declare properties and items so they have to be inferred by the MSBuidl engine so that the remainder of the build will not be hosed because of it. If you execute the PrintValues target the result would be what you see in the image below.
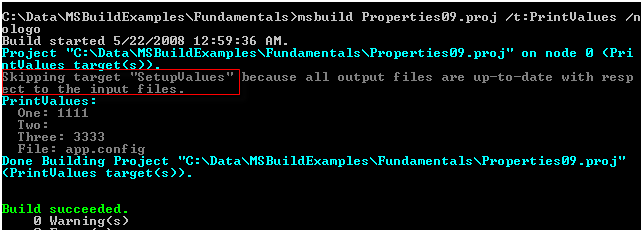
As you can see the values for the properties One & Three were provided by inference but the value for Two was passed over because it uses the ValueSetByTask instead of Value. I would suggest that you continue to use the Value property and not the ValueSetByTask unless you are trying to detect this exact scenario, which most of the time shouldn't matter anywayz.

OutputInferral.proj


Sayed Ibrahim Hashimi


Comment Section

Comments are closed.


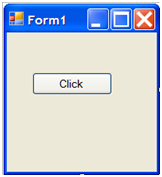
After some discussion at the MSBuild MSDN Forum I started investigating building the same project with different Compiler constants defined. I was actually pretty surprised by what I found. I created a simple Windows Form Application with a lone button one it. The image below show the simple app.

Here is the entire code behind file.

using System;

using System.Collections.Generic;

using System.ComponentModel;

using System.Data;

using System.Drawing;

using System.Linq;

using System.Text;

using System.Windows.Forms;


namespace WindowsFormsApplication1

{

public partial class Form1 : Form

{

public Form1()

{

InitializeComponent();

}


private void buttonExample_Click(object sender, EventArgs e)

{

string message = "default message";

#if CONSTANT_ONE

message = "CONSTANT_ONE";

#endif

#if CONSTANT_TWO

message = "CONSTANT_TWO";

#endif


MessageBox.Show(message);

}

}

}

Ddd

The parts to take note are the regions highlighted in yellow. So if the constant CONSTANT_ONE is defined the message results to CONSTANT_ONE and if CONSTANT_TWO is defined it will show the message CONSTANT_TWO.

I then created the simple build file.

xmlns="http://schemas.microsoft.com/developer/msbuild/2003">


CONSTANT_ONE

CONSTANT_TWO


Properties="DefineConstants=$(ConstOne);OutputPath=binOne\;"/>

Properties="DefineConstants=$(ConstTwo);OutputPath=binTwo\;"


/>


Properties="DefineConstants=$(ConstOne);OutputPath=binOne\;"/>

Properties="DefineConstants=$(ConstTwo);OutputPath=binTwo\;"/>


Properties="DefineConstants=$(ConstOne);OutputPath=binOne\BaseIntermediateOutputPath=objOne\"/>

Properties="DefineConstants=$(ConstTwo);OutputPath=binTwo\;BaseIntermediateOutputPath=objTwo\;"


/>


Ddddd

Let's take a look at what's going on here. The BuildConstOne target passes the CONSTANT_ONE value as a property when invoking the MSBuild task, and builds to the binOne folder. The BuildConstTwo target passes the CONSTANT_TWO value and builds to binTwo. If you execute the target BuildAll, you would expect that the exe in binOne would show the message CONSTANT_ONE and the exe in the binTwo folder has CONSTANT_TWO message showing. What you actually get is that both actually show CONSTANT_ONE. This is because MSBuild doesn't entirely rebuild the project when building it for the second time in BuildConstTwo. The real reason behind this would be because both projects are building to the same BaseIntermediateOutputPath, obj\. There are two ways to of getting around this, one is to call Rebuild instead of Build, and the other is to specify the BaseIntermediateOutputPath as well. In the above I have demonstrated both approaches. The ReBuildAll calls Rebuild, and the BuildAllBetter specifies the BaseIntermediateOutputPath as well as OutputPath.

Questions?!

You can download all the files at:

DefineConst.zip

Sayed Ibrahim Hashimi


Comment Section

Comments are closed.


A question that comes up pretty frequently is "How can I debug an MSBuild task"? It's actually pretty simple. In this post I will describe how to easily an effectively debug MSBuild tasks that you are creating. In this example I will be demonstrating a task from my open source tasks at www.codeplex.com/Sedodream. The task is one that was contributed by Grant Holliday.

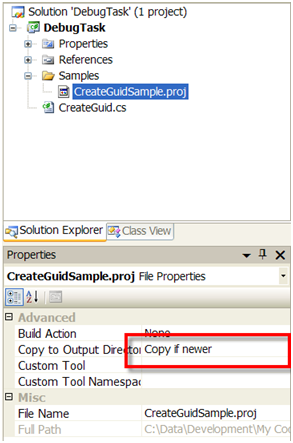
First in the project where your tasks are contained create a folder that will be used to contain sample MSBuid files that can be used to debug the tasks. This is also a good idea, because it will show people how to use your tasks. If you are don't want to mix samples & code in the same project then just make sure in your build you copy the files to the correct locations. In the sample project, which you can download at the bottom, the folder is named Samples. When you add MSBuild files to the folder make sure you set the file to be copied to the output folder as well. See the image below.

By setting this, the file will be copied to the output folder when the project is built. Since it will be in the output folder we can use a relative path to get to the assembly that contains the task. Take a look at the sample MSBuild file for this task.


    $(MSBuildProjectDirectory)\..\DebugTask.dll


The line highlighted contains the path to the assembly that contains the task. This path is relative to the location in the output folder, not the source folder. Also another thing to take note, is that we only write to the TaskLocation property if it is empty. This is useful because you can overwrite the location through command line parameters if necessary. But this shouldn't be needed for what we are trying to accomplish here.

After you create the sample, build the solution. And open a command prompt to verify that it works. Here is a sample of the result of this project file.

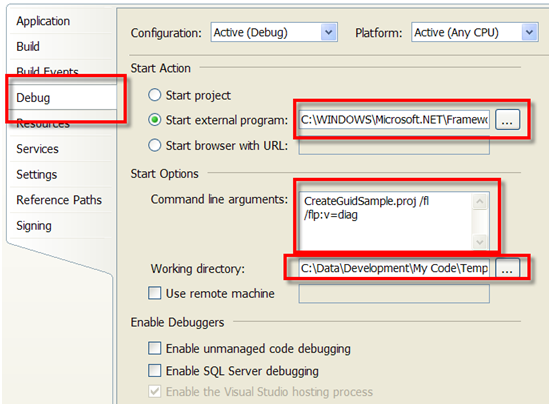
Once you've verified that that MSBuild file works then you can right click on the project that contains your task, and select properties. From there go to the debug tab. What we want to do is start the msbuild.exe executable on that sample project file. To do this fill in the full path to it in the Start External program text box, i.e. 'C:\WINDOWS\Microsoft.NET\Framework\v3.5\MSBuild.exe'. In the command line arguments you should pass the name of the project file followed by any msbuild parameters. Typically I will attach a file logger to the process. Finally you should set the working directory to the folder containing the sample. The result should look something like the image shown below.

Following this set a break point in your task, set the project as the startup project and hit F5! Another thing to take note of is that these properties are stored in the .user file so it shouldn't affect any other developers on your team.

Below is the link containing a simple solution that was used here.


DebugTask.zip

Sayed Ibrahim Hashimi


Comment Section

Comments are closed.


Recently I was introduced to a tool that was to a tool that would analyze Javascript for syntactical errors as well as usage of bad practices. This tool is JSLint. Douglas Crockford from Yahoo! created, and maintains, JSLint. If you haven't heard of him, he is a well known Javascript expert.

Now how can we verify our Javascript with JSLint & MSBuild? In my open source project Sedodream MSBuild I have created a new JSLint task. You can get the installer by going to http://www.codeplex.com/Release/ProjectReleases.aspx?ProjectName=Sedodream&ReleaseId=12530. After you install the msi you can follow these steps to invoke the JSLint on your projects.

Edit your web project file and include the following snippet before the tag.

<Import Project="$(MSBuildExtensionsPath)\Sedodream\Sedodream.tasks"/>

<Import Project="$(MSBuildExtensionsPath)\Sedodream\JSLint.targets"/>


<PropertyGroup>

<BuildDependsOn>

$(BuildDependsOn);

RunJSLint;

BuildDependsOn>

PropertyGroup>


The first line includes makes the tasks from my project available, and the second line includes the file that knows how to execute the JSLint tool. Following that I extend the build process to execute the RunJSLint target. If you are not familiar with this take a look at my article Inside MSBuild.

After you do this you may be prompted with a security warning from Visual Studio, you should pick 'Load Project Normally'. You can read more about how to disable it at http://msdn2.microsoft.com/en-us/library/ms228217.aspx. I chose to not have my installer set that registry flag. For the time being I think that users should make that decision themselves, although I would like to think I'm trustworthy J

After you do this and allow Visual Studio to load the project normally, if your create Javascript files that have errors, or JSLint doesn't like you will be warned in the error list as shown below.


With that being said keep in mind this is a V1 deal, so this may not work perfect. I am working to make sure that it works well, but it was kinda tricky to get this to work period!

As always I welcome your feedback and I will post more info about this later. Oh yeah by default from JSLint the GoodParts are enforced keep an eye on this blog, or send me a message, to see how to change that.

Sayed Ibrahim Hashimi


Comment Section

Comments are closed.


MSBuild Batching Part 3

Comments [0]

This post is to supplement the two previous posts that I have focused on batching those are located at:

Batching continues to be confusing and I hope that that post will help to further clarify it a little bit. In the two previous posts I think that I was "hiding" what was really happening by using built in metadata. This time I will expose what's happening by a simple example that only uses custom metadata. The first thing to know about batching, it always occurs over metadata, either Well Known or custom. Take a look at the project file shown below, Batching03.proj.

© Copyright 2008, Sayed Ibrahim Hashimi (sayed.hashimi@gmail.com)

-->

2008

SVR01

2003

SVR02

2008

SVR03

2003

SVR04


There are three targets that are important TaskBatching, which demonstrates how you can invoke individual tasks once per batch and then two targets; TargetBatching01 & TargetBatching02, which demonstrate batching an entire target once per batch. When you want to proform batching you will always use the %(…) notation somewhere. In Task batching this will be notated only inside of the tasks' parameters. In target batching this notation will be declared in the targets Outputs attribute.

Zooming in on TaskBatching target here are the results and we will discuss

The comments on the image pretty much describe what's happening. In the first execution there we are not batching. So the item is transformed into a string and passed into the Message task. The transformation is described by what is contained in the ->(). So the Metadata Name for each element in Server is evaluated and a string is created from that by concatenating each of these values. If there were duplicate values then the duplicates would show up in the resulting string.

Moving on to the next one, we batch on the Name Metadata. Since there were 4 Name metadata values the Message task is invoked 4 distinct times. The same applies for the Next invocation of the Message task.

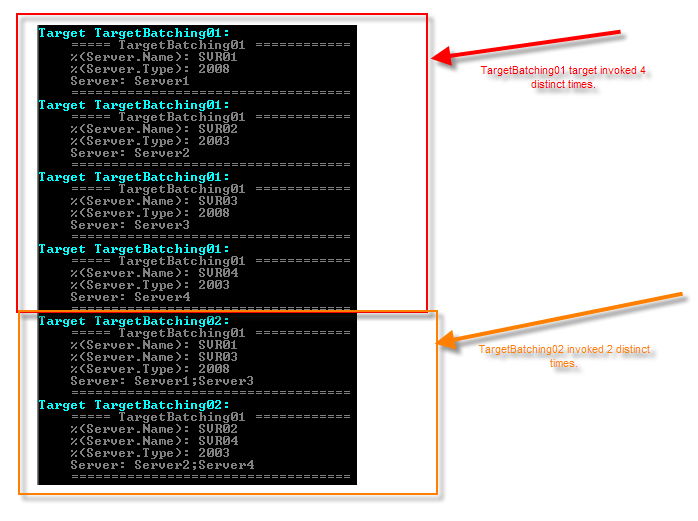
Now let's take a look at the Target Batching. I simply invoked these targets, nothing special. The TargetBatching01 target is batching on the Name Metadata, and the TargetBatching02 on the Type Metadata. The output is shown below.

Because there are 4 distinct Name values TargetBatching is invoked 4 times, and similarily TargetBatching twice because of the distinct Type values. So if you just need to perform a single task over a set of parameters, the use Task batching. But If you need to perform a set of actions on a set of parameters then use Target Batching. More to come later on this topic I'm sure.

As a note I have decided to resume work on the MSBuild book I referenced in earlier posts. You'll be happy to know that I will cover batching in great detail there.


Sayed Ibrahim Hashimi


ddd


Comment Section

Comments are closed.


<< Older Posts | Newer Posts >>